
Chapter Twelve:
The Sode
Development
Armours made prior to the 1400s were equipped with larger sode of seven 12"-wide lames. This was the common pattern for centuries. A variation which appeared about 1300 was the hiro sode (“broad sleeve”), which was narrower at the top than the bottom. An inverted form appeared a few decades later. Sometimes this was called tsubo sode (“jar sleeve”), a name conflicting with a later type of sode that was narrower and smaller, and actually well curved to fit the upper arm.
Sode during the latter part of the sixteenth century resembled rectangular kusazuri, in that they were made en suite with the kusazuri, in the same style and pattern as the rest of the dangly bits.
A late variation on the sode was the bishamon gote, which incorporates a sode into the armour sleeve itself. The lames of this sode were hinged in two places to make the fit more comfortable. Only the bottom lame or two was actually allowed to flop loosely, as the penultimate (or penultimate less one) lame was stitched down to the sleeve.
Early Sode
Except for a very few examples, the cap piece—the kanmuri ita (“crown plate”)—the top-most plate of the sode was covered with printed leather and edged with a gilt fukurin.
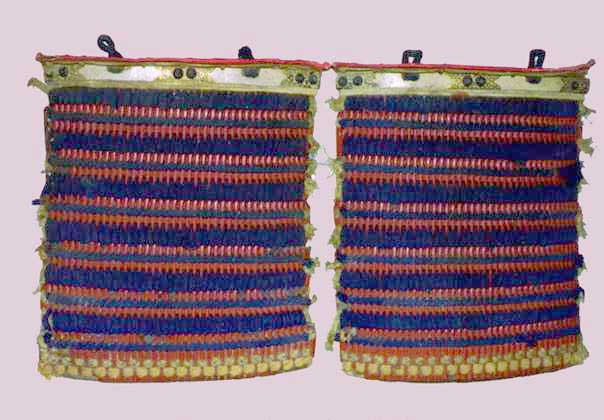
The outside and inside of two ō-sode. Note the vertical panel on the inside; this is only on the right sode, to keep the arrows from slipping between the boards.
The sode was usually of kozane, as was the rest of the armour. Long cords on the front and back tie the sode to the watagami, while a cord emerging from an ornate fitting on the back holds the sode in place.
Inside the back edge of the right sode you will usually find a long leather strip. This is designed to prevent arrows, kept in a quiver worn at the right hip, from getting messed up in the sode’s lames. This strip is rivetted into place with small brass rivets at the bottom of each lame.

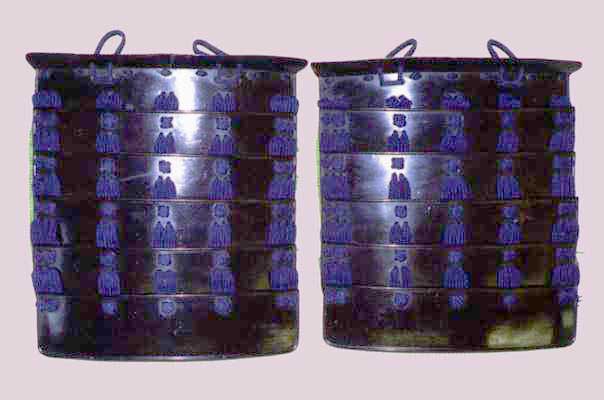
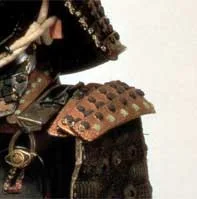
The Edo period produced monstrosities like ō-sode made of solid lame construction and with sugake lacing. Pictured here is one such abomination for your amusement. Please don’t do this. Ever.
Tōsei Sode
In the early sixteenth century, someone came up with the idea of making sode smaller and less cumbersome. Since they were often put on mōgami dō, they came to be called mōgami sode. These smaller models were also called tōsei sode or kosode (this latter as opposed to their larger cousins, the ō-sode). The original large, square models were given the name ō-sode.

Tōsei sode were made to the same pattern as the other dangly bits. The width of the lames is the same as that of the kusazuri (usually the same as the dō as well).
Tōsei sode were occasionally backed with a cloth panel the full width of the sode and as long as the next-to-last lame. This served to prevent rattling and to provide some additional padding as well. (It also cut down abrasion on the plates of the kote.) This panel was two or three layers of fabric, perhaps rimmed with bias fabric tape, and stitched to the edge of the lames along the top of the top-most lame and the bottom of the next-to-last lame through small pairs of holes. These panels were by no means standard features, but they weren’t uncommon.
The top-most lame—the kanmuri ita—bends up at a sharp angle. This angle may be rimmed with a fukurin in more expensive armours. Two pairs of holes emerge from the kanmuri ita at the base of the turn-back. Through these holes pass the kohaze, the frogs and cords which secure the sode to the watagami.
Attached to what is taken as the back of the second or third lame can often be found a small ring. This ring is for the cord which may or may not be used to hold the sode in place much as the ring on the kōgai kanamono on the ō-sode.

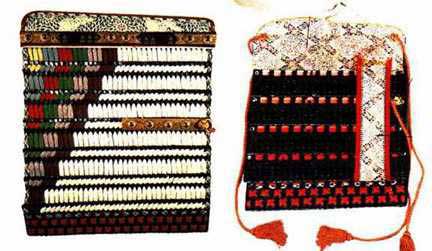
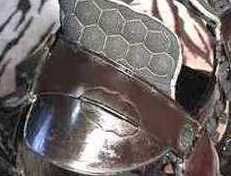
In the Edo period, sometimes the smaller sode were made with larger solid panels (sometimes a single panel, sometimes several lames riveted together) that might be embossed or otherwise decorated, with only the bottom-most section left to flop around. Here on the right is one such example, covered with patterned leather and ornamented with two huge gilt-copper bats. Again, please don’t do this if you are attempting to make Sengoku period sode.
Kohire
Kohire were winglets (literally—the word means “small wing”) attached to the watagami (shoulder straps) and extending out over the shoulder. Kohire are a feature found only on tōsei gusoku, not on earlier armours.
Kohire were made of brigandine, solid plates, or even two or three small lames laced up in the traditional manner. Kohire of brigandine were easier to fit with sode, while solid or lame kohire made the fit difficult. In fact, the brigandine kohire came to be a standard feature.
The use of solid or lame kohire meant that sode could not actually be worn comfortably with the armours, but often suits were equipped with sode anyway, as they were expected to be provided.
Construction
Ō-Sode

Some armourers just make sode, using them as samples to display various lacing patterns and leather patterns. You might want to make a few; they make interesting wall hangings.
Build up lames of scales (enough to reach c. 12" width) or cut your lames to that length. You will need seven boards/lames per side. If you are using hon kozane, remember that in this instance the top-most plate (ichi-no-ita) should be of menashi zane.
Cut out the two kanmuri ita to the width of your finished lames. If you’re working with scales, never cut your kanagu mawari until the scales are laced together. This will help you avoid unpleasant surprises. After opening the necessary holes, shape it as shown in the illustration.
Cut out two strips of wood about 1/4" thick, 1/2" wide, and the length of your sode. Place one kanmuri ita behind a wood strip, and drill through the three pairs of holes. These holes will take the ornamental rivets that hold the ichi-no-ita—the first lame—to the kanmuri ita.
If you are using solid lames (either for a kiritsuke zane ō-sode or a post-Period itamono ō-sode), decide which lame is to be the top-most and which is to be the bottom-most and set them aside. Open the holes in the rest of the lames as necessary to fit kebiki or sugake lacing. On the bottom-most lame, punch all the bottom sets of holes for the hishinui. For the ichi-no-ita, lay the wooden strip along its edge and with your Sharpie outline the six holes to be punched.
The next step is to finish the surface of the lames with whatever paint or finish you intend.
Prepare your printed leather panels for the face and backside of the kanmuri ita (or paint the thing, as you prefer). See the section on printed leather in the chapter “Before Beginning” to see how this is done. If you’re using leather, open several small holes for the kozakura byō (lit. “small cherry blossom rivets”) that help hold the leather in place. Liberally slather the surface of the kanmuri ita with Barge Cement and press down the leather. Let it dry. Using a sharp X-Acto knife, open holes in the leather where the holes in the metal plate are and insert the rivets.
Make your tying rings—three per sode—according to the method described in the chapter “Before Beginning.” Cut the ends of the ring to length after placing them in the sode. Through the three independent holes (not the three sets of paired holes) in the base of the kanmuri ita, insert the shanks of the three rings you have just made. These rings on the inside of the kanmuri ita are for tying it on. The front and back rings should be vertical, the center one horizontal.

Cut two panels of black leather (fabric lining thickness—call it 1-2 oz.) large enough to wrap the wooden slats. Cement the leather in place and make sure the leather completely covers the face, top, and bottom, with an excess over the top and sides. When you assemble the thing (as per the illustration), the edges are pulled back in a manner similar to making “hospital corners” on a bed.
Take four, one-foot-long strips of wire (16-gauge wire is fine, though if you can fine 1/32” reeds, great!)—two per side—and two strips of red cloth and two of white. These cloths are 1’ by 1/4“. Place the wire/reeds along the center the cloths, add glue, and fold them in half so that the reeds form a very clear rib in the fabric. See the illustration to see how these all fit together.
Take the ichi-no-ita, then one of the white strips, then the red strip. Center them so that they overhang the edges by about an inch or so, so that the reed runs only the length of the lame. They should be near the top. Poke holes in the cloth with an X-Acto knife where the ornamental rivets will go. Fold the cloth under the lame and put the leather-covered wooden slat in place, folding back the remaining flap of the leather, and place the kanmuri ita under the lame. Insert the three pairs of ornamental brass rivets, and spread back the split shanks, or pien them down over small washers.
Lace up the sode using your chosen lacing material and pattern.
After lacing the second lame, you can finish detailing the kanmuri ita. Apply Barge Cement to the back of the ichi-no-ita and press the printed leather in place. Drill a small hole at each edge of the bottom plate and one or two near the middle for good measure, put in small rivets, and pien the rivet down. This will hold the leather in place.
Take an 18-gauge brass strip and cut it according to the pattern here for the kōgai kanamono, fold it back on itself. Insert a brass ring about 34” in diameter at the end and hammer it into place. This strip is rivetted to the outside of the fourth plate with the ring hanging over the back. This is to attach a cord to the agemaki at the back of the armour, holding the sode in place. Open the holes in the strip. Scratch the location of the holes into the fourth lame, then drill.
You can now finish lacing the sode.
Once you’ve laced past the fourth lame, you can attach the kōgai kanamono (the strip with the ring) by means of ornamental brass rivets (split shank is the preferred medium).
Run a strip of printed leather 1 1/2” wide along the back edge of the inside of the right sode (as per the illustration). Rivet it to the bottom of each lame at both edges of the strip.
Attach long cords to the fore and rear rings inside the kanmuri ita.
You’ve just finished your fancy ō-sode.
Mōgami Sode

One difference between the ō-sode and mōgami sode is the kanmuri ita. For the former, the term only refers to the separate cap plate attached to the first lame; for the latter, the term refers to the cap section and the first lame, which were either the same piece or at the very least permanently attached. Be aware of this difference as you read the directions.
Your tōsei sode (an alternate name, “tōsei” meaning “modern”) can either conform in width to match your kusazuri and dō or you can cut them about 1/4” narrower. I have always preferred delicate-looking sode, so if you are using 2 1/2“ lames for the dō, go ahead and cut the sode at 2 1/4“. Cut the lames to 9“ lengths. Note that if you are making sode with narrower lames than the dō, you will need to use a narrower lacing as well to keep the proportions even.
Punch or drill holes as appropriate (and your mantra should become “to match the kusazuri”). If you are using hon kozane, those for the top lames should be menashi zane.
Your bottom-most plate must also match that of the kusazuri, so you must reproduce the pattern here. If it is laced with hishinui, fine. You can also cut the bottom corners to a curve. You may wish to leave the last lame plain, a common style with retainer armours. You may also wish to pain your mon (crest) on the lame. You may apply very faint lip to the top, front, and back edges of the plates, and all around the bottom lame if you desire. Just remember it should match the bottom plate of all dangly bits.
If you are planning to use a padding cloth, make pairs of small holes along the plate edge, horizontally along the kanmuri ita below the fold, and along the bottom of the last or next to last plate.

For solid, retainer-style sode, cut out the curving cap to the kanmuri ita, fold the tabs up, and rivet the kanmuri ita to the cap piece. Grind the rivets flat, so they don’t show. Paint and finish the plates of the sode (repeating the mantra: “to match the kusazuri”).

For more ornate sode, you need six hassō byō (ornamental brass rivets) per piece: two on either end and two in the middle. These are seated on strips of brass (hassō kanamono) as shown in the pattern in the chapter “Before Beginning.” Open holes in these seatplates, the top lame of the sode, and the kanmuri ita. Rivet through all three plates, but do not grind down the rivets. For a dress armour you should use split-shanked rivets.
Lace the sode (to match the kusazuri).
Run a strip of lacing through each of the pairs of holes and create frogs in the same method used for the dō fasteners.
If you wish to add a tying ring to the back of the sode, make one as per the illustration for ō-sode, but cut it short at the dotted line. It will take only two rivets instead of four.
Now it’s time to make the padding panel (if you’re using one). Stitch together two layers of fabric matching the foundation for your kote, sandwiching a layer of or two of canvas between them.
The width of the finished panel is a hair less than the breadth of the sode, and the length corresponding to the distance from the top of the kanmuri ita to the bottom of the plate to which you intend to attach it. Stitch it in place with several strands of embroidery floss (matching the color of the lacing or the lacquer as best you can) and tie off the knots on the underside of the sode.
Your mōgami sode are finished.
Tsubo Sode

Tsubo sode (of the Sengoku period) are made similarly to conventional tōsei sode, but with a deeper curve. Curve them to match the kanmuri ita in the pattern, here, and construct them in the same manner as for the mōgami sode.
The pattern for the rest of the plates is identical to the pattern for a tōsei sode, although often narrow as they go down.
Kohire
If you don’t want to wear sode, and your armour is late sixteenth century in style, you have the option to make and use kohire instead. If you make kohire of lames, they should, of course, comply with the rules for similarity of design and construction with the dangly bits.
Personally, I prefer kohire to sode for shoulder protection. They’re far less restrictive when it comes to SCA-style combat, and perhaps more protective.
Follow the pattern here for solid plate or lamellar kohire. For the pattern for a brigandine kohire, see the section on padding the armour in the chapter “Making a Dō.”
Sode Gallery
The following graphics link to larger images (some are very large) which will pop up in a separate window so you can look at several sode.