
Chapter Ten:
Men Yoroi
The term “men yoroi” literally means “face armour” and it usually refers exclusively to protection worn on the face. For the sake of this work, however, we will take the term to extend to the various gorgets and throat armours the Japanese wore. We will, however, divide this chapter into two sections: face armour, and neck and throat armour.
Types of Face Armour

Happuri
There are a few different types of armour for the face, and all have different names depending on exactly what they protect and even on their specific style. Pictured here is a happuri, sometimes called a sarubō (lit. “monkey cheeks” for the simian look it creates).

Hitaigane
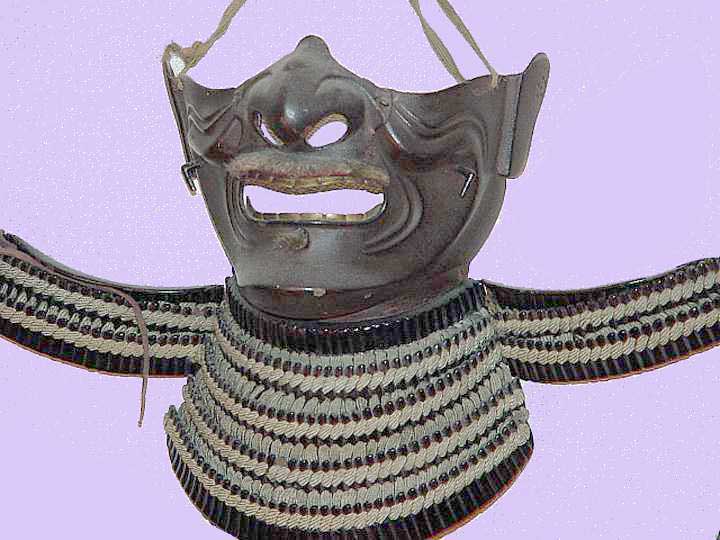
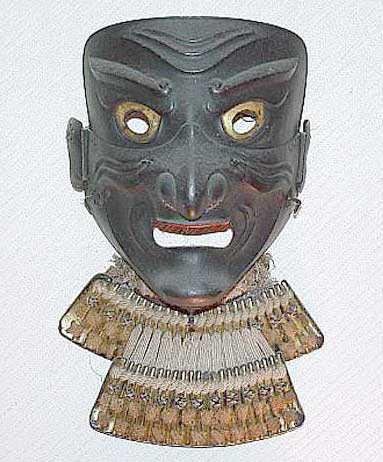
The most familiar form of facial armour is the half-mask, the menpō, which covers the nose, cheeks, jaw, and chin. Most were made with removable nasal sections, allowing them to be turned into makeshift hanbō. Not everyone wore a menpō. Some considered them uncomfortable and hot, while others found them preferable to having helmet cords digging into their cheeks and jaw. Six of one, half a dozen of another.
The sōmen, or full face mask, was very seldom worn. Its Period forms were far less rococco than those of its Edo Period cousins. Even compared to the menpō, the sōmen was really a simple piece of armour.

Hitaiganemaki
For the forehead and cheeks, warriors might wear a happuri, or just for the forehead a hitaigane. Some defenses were even simple metal plates or mail sewn to a head cloth, which was a hitaiganemaki.
Menpō


Despite the fact that few samurai actually used them on the field, you will probably want to make a menpō just because a kabuto on a stand never seems to look complete without one. Some grimacing menpō are quite outlandish, but to make your life easier, we will make a simpler, less exaggerated form of this armour. (You’re welcome.)

If you want something even more abbreviated—a hanbō—you can just omit the nose piece and cut the cheek piece shorter as indicated in the pattern.
Menpō are unlined, so the fit should be close to your face. Modify the pattern appropriately to fit you. I’d suggest first making a rough version of one in posterboard or light-weight aluminum (cheap and easy to work) to check the fit and to see if it will work for you, and then making any modifications you might need.
Cut all the pieces to your final pattern and punch the necessary holes. The first piece you will work is the cheek/jaw; shape it by dishing and/or raising to the form indicated in the illustration. The chin should jut out, and the cheeks should be nice and shapely.

Put the bottom over the anvil horn and turn the bottom edge of the chin back under, as shown in the photo to the left.
Slightly dish the piece for the underside of the chin. Place the finished chinplate inside the first piece and mark the holes. Punch the holes and rivet the chin in place. The photo at left shows the underside of a menpō’s lower section with the bottom plate in place; note how it fits. Remember that the heads of the rivets are on the inside, and you want to smash the rivets in as you will be grinding them flush with the surface of the mask. The central hole in the chin is to allow sweat to run out. More expensive menpō have a small tube attached here which looks like a 1/2"-long straw.
Attach to the rear of the chinplate (the part closest to your neck) the turn-down that holds the yodare-kake (the “bib“) in place. You must curve this piece to fit the back line of the chinplate, and then turn up a lip to rivet. The lip fits inside the chinplate similarly to the way the chinplate fits inside the cheek. You can also weld this plate to the chinplate if you prefer.

The noseplate is the most daunting part of the menpō for many. For this reason, you might want to just go ahead and make a hanbō instead (an extremely abbreviated version is pictured at left). If you’re feeling adventurous, though, and want to be really satisfied with yourself, try the full menpō. This is the hardest piece of all as it actually requires skill with dishing, raising, or even repoussée.
Such things cannot be taught through the print medium, so for this reason I will show a simplified pattern and leave the methodology to you. The illustrations show the steps in making a simple nose. Note that after shaping, the upper lip is flush with the lower cheek section. You can either weld the two sections together or rivet them together by means of two 1/2"-square plate bridges (one under each side) and riveted through the upper lip and lower cheek. Remember to grind the rivets flush. Although using the rivet-bridge is the easier method, welding will allow you to make the join truly flush, and you can grind it smooth and it will look like one piece.
The cheek section of the nose should overlap the menpō cheeks by about 1/2" on either side, and it should sit flush (i.e., replicate the curvature of the cheeks). The photo at left shows the nose plate from the inside. Note that this one has the optional tooth plate in place. It is not perhaps clear from the photo, but the nose is here actually in three plates: the nose itself, the upper lip, and the teeth. The pattern I’ve provided is slightly simplified in that the nose and upper lip are one piece. It is perhaps easier to cut out if you make them separate plates, as shown in the photo. Look on the inside upper lip, and you may discern what appears to be a tab from the center of the nose. That’s where the nose plate underlaps and joins to the upper lip. The separate nature of the tooth plate is more obvious.
Mark the point on the cheeks where the holes in the side of the noseplate sit. This is for your next two rivets. These are wire rivets, made from 14 gauge (or better, 12 gauge) wire. Note: the holes for these two rivets are actually about 18" in from where you make your marks, as the nose is held on by spring action. Cut 3/8"-long pieces of wire, create a head on one end, and drill or punch holes in the cheeks large enough to allow the rivet to barely fit. The long shank should stick out about 1/4". Carefully pound the rivet to expand it in the hole, but don’t damage the shank. (You might want to experiment a few times to get this right.) You could even weld the shank in place. With a set of needle-nosed pliers, bend the rivets at right-angles away from each other. Then, with some good wire snips, cut the ends of the shanks so that they are just long enough to fit through the longish holes in the nosepiece. Test the fit a few times.
If you want teeth in the mouth, cut the teeth plates and rivet (or weld) them behind the lower lips, and behind the upper lips as shown in the photo. This must be done with both upper and lower teeth. The easiest way to make them look like teeth is to cut into the metal with a chisel or crosspien hammer between ridges, forming “separations” and giving the illusion of separate teeth.
Cut the four plates of the yodare kake, punch them (either for sparce-point or full lacing), and curve them. The curvature you apply should graduate so that the top-most one fits the turn-down on the chinpiece, and the bottom-most lame is nearly flat.

You must shape and rivet down the ear flanges next. The form is simple; they are perhaps the easiest part of the menpō to make. The photo at left shows a profile of the menpō without the nose plate in place. Note the extreme point of the chin, the location of the wires for the cord and the wire for the nose (barely visible at the front of the cheek). This amount of detail on the ear is optional; many menpō have flat ear flanges, or even pierced-work flanges. Some don’t even have this feature at all.
Repeat the wire riveting at the sides of the cheeks; these larger versions of the wire rivets—standing up a good 3/8" and bending over for a further 3/8"—point down and are there to hold the cords that tie the helmet on. If you are making a hanbō, you still need them.

You are now virtually done. Do you want a painted moustache, or a real one? Painted ones were common in cheaper armours. If you’re using real hair, paint the menpō first. The photograph here on the right shows an applied horsehair mustache. The upper lip may be made either by rolling the lip out slightly, building it up with lacquer, or actually cutting it with extra material and rolling the lip (as was done here).
Traditionally, menpō were either red or they matched the armour. If you’re making a black armour, then, the menpō can be black or red. If you’re making a russet armour, it would be red or russet. The inside is nearly always red, although I have seen more than one that was gold-leafed inside. (Remember that the color of the yodare-kake and the color of the menpō need not match the menpō itself; however, the color of the yodare-kake should match that of the other dangly bits.)
Horsehair is the preferred (and authentic) medium for mustaches. Roll out a small “snake” of Bondo or some similar adhesive, putty-like substance (making sure that it matches the color of the paint). Place it on the upper lip securely, then begin pressing in half-inch lengths of hair (think of the bristles of a toothbrush). When the Bondo has dried, clip the mustache to shape.
Lace the yodare-kake. Next take about two feet of lacing braid, knot one end, thread the other through the hole by the ear (with the knot inside), and into the hole on the other side, and knot it. This is to help hold the menpō on, in the manner of the upper strap on a surgeon’s mask. You should take up the cord so that it is a reasonably snug fit before making your finishing knot.
Sōmen
Your only “mask option” for combat is the sōmen.
Unlike the grill protection, sōmen change the way you wear your armour, for you wear it directly on your face, similar to a catcher’s mask. When fighting, you will have to put it on before the kabuto, as the kabuto’s straps will do double-duty and help hold the mask in place as well as keep the helmet on. This pattern is a refinement of one originally used by Sir Sven of Vandaleven (David Mathews) of the barony of South Downs in Meridies; the modifications were to bring it a bit more in line with extant period models. The metrics, however, remain more or less the same. Note that it is a much looser fit than the menpō, as it must accommodate padding.
Please remember that the wearing of sōmen went out of fashion well before the Sengoku period. The few pre-Edo extant models are quite simple, and don’t exhibit the wrinkles and grotesque grimaces common on menpō of that period. There was a resurgence in making of full face masks during the Edo period, however, and these naturally followed the more elaborate and exaggerated detail of the menpō of that time.
If you intend to wear a sōmen in the SCA, be warned that some marshalls may need convincing that it is legal. You will want to pad the entire inside with about 3/4"-1" of closed-cell foam. Construction of the sōmen follows that of the menpō (see above), but adds one more piece: the forehead. The pattern allows you to replicate an authentic sōmen from the late Muromachi period. It was surprisingly simple and non-ornate, unlike the typical menpō.

Cut the forehead out and cut the cheeks to the modified pattern shown. Note that the pieces are larger than the menpō. This is because the menpō is unpadded and sits right on your face. The sōmen is padded and sits off of your face. Dish the plates and form them as for the menpō,adding the forehead plate. Follow the construction and painting techniques for the menpō (although you might want to leave off painting the inside if you are concerned about the padding sticking). The nosepiece is riveted solidly to the cheeks on the sōmen.
If you are going to be fighting in the SCA, pad the sōmen throughout with closed cell foam glued into place. You might want to allow some cavities for cooling off, so if you don’t pad the whole thing, be sure to pad along the forehead, chin, and cheeks. I recommend not padding the nasal area; a total open space is better than something that can be jammed against your nose. Of course, this is a comfort opinion, not a legal one...
Make a cap of fabric and stitch it into place along the inside edge of the sōmen’s forehead. Remember that the cap will need to come farther out in front than if you simply place it on your head, as the sōmen will sit a bit out from your face. This will not hold the sōmen on firmly; for that, you will need to use the cords from your helmet, as they both hold the kabuto and the menpō to your head.
Throat Armour
There are a few different kinds of throat and neck armour. We will look at two: one suitable for combat wear and one more suited for dress.

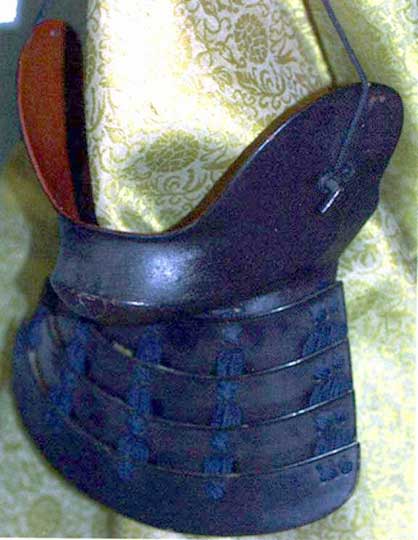
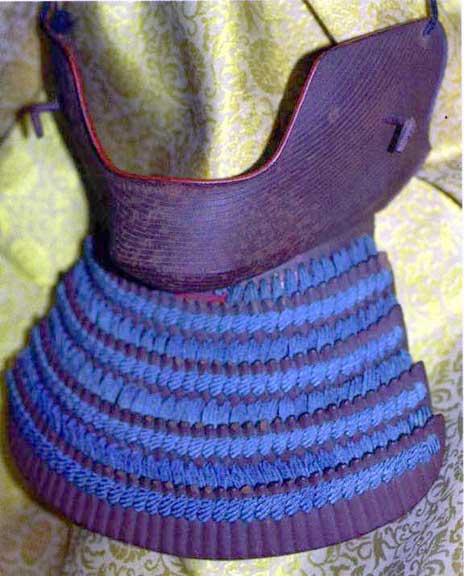
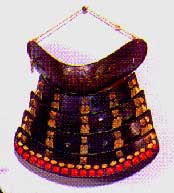
The nodowa (lit. “throat ring”—note, it’s pronounced nodo-wa, not no-dawa) is not so much a gorget as we think of them for SCA combat as a defense for the lower throat. The eriwa is more an SCA-type gorget, and the guruwa is even better for defense. The nodowa is an older design, and is not really common in late Period. The eriwa and guruwa were also only seldom met with. The illustration at left shows a guruwa (top) and a nodowa in cutaway profile, showing the different levels of protection.
Although most armourers made throat armour with two low, flat, arcing lames like a nodowa, some made them with four or five narrower lames like a yodare kake. The choice is up to you, although the former is probably more comfortable.
Nodowa

The best nodowa are made of kozane. Note that there must be a severe angle on these scales—similar to kozane used in shikoro—to allow them to form an arc when laced together into boards. You can, however, cut out solid plates to the pattern provided. If you use kozane, they should be of the same style and general measure of those used in the rest of the dangly bits, and when laced together conform to the same shape shown in the pattern.
Note that the left and right edges of the first lame have visible hishinui, so you will have to be careful in constructing this. Paint the lames and let them dry. Lace the hishinui only and set them aside.

Cut the throat plate out of 18-gauge steel. The inner measure should allow the nodowa to nestle closely to your throat. You might want to make sure you’ve filed the edges good and smooth before trying this, as a ripped-up carotid artery can really put a dint in your afternoon. (Heck. Play it safe. Roll the edge or add fukurin.) Punch or drill the series of holes along the center. These are for lacing on the leather panel that holds the lames. Also punch or drill the holes at the end of the “wings.” These are for the tying cords.
Dish the plate slightly according to the diagram, and put a lip all around the edges. Paint the throat plate and set it aside.
Cut out the leather panel as per the pattern, and print it. Deer skin is the traditional medium. The leather panel is decorated and constructed as described in the section on printed leather in the chapter “Before Beginning.”
Fold the top end of the leather over, and using a heavy, broad needle and artificial sinew, sew the leather to the throat plate. Place the first lame on the leather and use your Sharpie to mark the holes for the nawame garami. Open the holes with a leather punch and replace the first lame over the leather bib. Lace the nawame garami in the usual fashion, securing the leather behind the lame as you go.
Now lace the second lame to the first in the usual fashion.
Your last step is to attach the tying cords at the ends.
Your nodowa is now finished.
Guruwa
This is possibly the best Japanese throat defense for SCA combat. Regardless of what type of face armour you make—bar grill or sōmen—you should still wear a guruwa, as it’s still possible for a sword to get in under the yodare kake. For the sake of comfort, make your pendant lames the same style as in the nodowa above. All that should be different is the construction of the neck piece. A simple guruwa can be hinged with leather flanges, but the real model has true hinges at each joint.

Note that you will have to tailor the throat section to fit your own neck. Cut the two side-and-back pieces of the guruwa according to the pattern, and cut the front piece with any additional (or reduced) length removed from the center. When assembled, you will want it to fit with about 1/2" overlap in the back, and the guruwa should sit about half an inch from your neck if you pad it. Real ones, of course, weren’t padded and fit tighter.
Curve them to fit your neck and hinge the pieces. Dish the top and bottom of the throat section as necessary for a comfortable fit. Again, a real guruwa has a cord emerging from the center of each side-and-back plate with which to tie it on, while for combat you may wish to consider a buckle arrangement. After shaping the neck plates and assembling them, paint the guruwa.
Construct and attach the hanging “bib” in the manner described above, be it for a menpō-style yodare kake or a nodowa-style bib.
Attach the tying cords or buckle, and glue some foam padding to the inside.
You are now finished.