

Chapter Four:
The Kozane
Construction and Materials
This chapter isn't the where patterns and actual styles of armour will be addressed: that will be under the specific chapters under the part of the armour you will be working on. In other words, in this chapter you will learn how to work with and make Japanese kozane (scales), but you will have to look under the chapters on dō or sode to learn the metrics, forms, and patterns.
Your first consideration must be materials. If you're using real leather for real Japanese armour, bravo. You won't be using conventional leather, though. You'll need rawhide. Thick rawhide. Japanese rawhide is—and I'm not kidding—over 1/8" thick. (That’s thicker than you think. Look at a ruler. Now add that measurement almost again for the thickness of lacquer.) Traditionally it comes from the back of a Chinese water buffalo. It's a bear to work; you saw and drill, you don't cut and punch. If you're using this, you're making real museum type armour, not an armour intended for contact combat in the SCA or other re-enactment groups. You'll also want to be using real lacquer, which is a natural resin, not to be confused with the stuff you buy in cans in auto supply or hardware stores, and this is beyond the scope of this manual. I'll be happy to let you in on the methods if you ask, however.
So... what will you use?

Smooth black plastic—if chosen with care—has the right combination of rigidity and resiliency to survive the beating SCA combat dishes out. It also approximates the look and thickness of lacquered Japanese scales. I do not—and probably will never—advocate the use of plastic for body armour other than Japanese scale. It has the right look, because after all, lacquered leather looks like plastic anyway). The photo at left shows a piece of lacquered leather-based iyo zane. Looks like shiny plastic to me…
While I'm debating conducting experiments using plastic for body armour, the one thing I can't abide is the use of raw barrel plastic—especially the blue smurf stuff—for armour. This is abomination to me, as it never has the right look, no matter how carefully it is worked.
Those who know me accept that under normal circumstances I twitch like I'm plugged in to a wall socket when someone says the words "plastic" and "armour" in the same sentence... but I do recommend plastic (ABS, Kydex, or something similar) for kozane. The reasons are well considered. Given the size of the scales, metal can't take the beating we give it unless it's good and thick, at least 14 gauge, and that would end up weighing a ton (I imagine aircraft aluminum might be sufficient, however). Leather, after a cuir bouilli or waxing process, is likely to be too brittle (given the size of the kozane). Cuir bouilli is fine for large pieces, but for plates two inches by half an inch, shot through with 13 holes each, it's not enough. Untreated leather, on the other hand, has the resiliency, but not the necessary rigidity.
You'll want plastic that's nearly 1/4" thick (or a bit less if you're going to make mitsume zane, a kind of triple-layered scale), and slightly flexible. Fortunately, there's a professional option now available: pre-made, molded plastic kozane.
Noble Plastics, a maker of plastic scale plates for SCA combat, have started to produce plastic kozane that I designed for them. (They are calling these “Effingham plates.”) These are perfect for SCA combat use, and even for constructing dress armours. They are 2.75" long, and a bit under 3/4" wide—perfectly sized for 3/8" lace such as thick poly shoelacing, and marginally passable for use with 1/4"-wide lacing such as gutted poly parachute cord.
For more information on pricing and ordering, contact them at this e-mail address and tell them you read about it here.
If you're making a combat armour, you might want to consider this: rivet the kozane together instead of tying them together at the bottom (at least where rigidity is required). Be careful, though, that you leave enough play with the riveting to allow the scales to wrap. Frankly, I don’t recommend this method, given the incredible number of rivets and so on, but I mention it as a possible option. If you choose to do this, don‘t forget that on the bottom-most plates, of course, you will have to lace the scales with the required ornamental crosslaces, so you need lace them the normal way (or lace over the rivets).
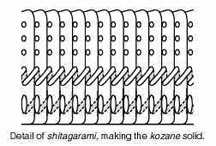
Kozane are first laced together into boards of specific length by the four pairs of holes on their bottom halves. This initial lacing process is called shita garami (lit. “lower-binding”). Real shita garami is done with deer hide, but here you can use whatever you are comfortable with. Nylon braid is a good alternative—in fact, gutted parachute cord (preferably black) is ideal. This first step is required with any form of scale armour.
Kozane Size

Remember that over the years, and depending on the style of armour, the size of kozane changed. As a rule, they grew smaller—both shorter and narrower. This might not matter to you, but it is something to keep in mind as you design your armour.

The size of the scale you use is also a product of the width of the lacing material you can get your hands on. A measurement you should keep in mind is the dehaba. This is the term for the amount of space exposed for a scale ridge when the scales are laced together. In other words, it is the tooth-width. The odoshi should be slightly broader than the dehaba. The Noble Plastics kozane is designed for a dehaba of a hair less than 3/8", which is why 3/8" poly cord is perfect for it.
In the real world of Japanese armourers, it is, of course, the other way: lacing is custom ordered to fit the width of the scales being used. In our world, however, we have little choice. If you are fortunate enough to have access to wider lacing material, or are planning to use leather you cut yourself, this is an academic issue. If you can only access one width of lacing material, do not vary the widths of your kozane.
In a truly historical reproduction, it would be a mistake to make the entire armour using the same size kozane. Kozane used in the dō, kusazuri, sode, and other parts were almost always of different sizes. It is obvious that the kozane in the shikoro, for example, would even be cut differently—broader at the bottom than the top—to allow for the conical shape of the shikoro. This is also the case for kozane used in the manufacture of a nodowa or yodare kake (both forms of throat armour).
This is the only aspect where you will have a problem with using the Noble Plastics kozane—there is no reason for a combat armour in the SCA that you can’t get away with the same size scales—although when I designed them I purposedly made them a bit longer to allow you to cut them a tad shorter for sode and kusazuri if you wish (or you could just lace them with a slightly shorter suspensory lace). Also, they simply won't serve for yodare kake or for shikoro—they simply lack the proper shape for this purpose. For those, you will have to use kozane you make yourself.
Warping Kozane

Starting around the fifteenth century, armourers started "tailoring" the waist of the dō, eliminating the broader, expanding silhouettes of the earlier period.
To accomplish this, they adopted a method that took some skill to pull off. They warped the scales in a slight S-shape to force the upper row under the row below it. This is difficult to do with the lacing holding the boards rigidly together.
Others laced the kozane together in a slight arc so that if a board from the nagagawa were laid flat, it would form an arc rather than a rectangle. When curved to fit the body, this causes a slant that allows the lower part of each lame to "fit inside" the top of the row below it. This is the method you will have to follow with the Noble Plastics kozane, as there is no taper.
If you are making your own kozane, this taper can easily be recreated by cutting the kozane of the abdominal section of the dō narrower at the bottom by about about 1/16". (The kuzasuri and tateage kozane were straight.) It may not sound like much but shaving off 1/16" (less than the width of a line drawn with a standard Sharpie!) subtracts an inch every 32 scales.

Types of Scales
There are two primary types of armour scales: hon kozane and iyo zane.
The earlier form of Japanese scale is often called "hon kozane" (lit. "true small scales") to distinguish it from the ersatz version, called kiritsuke zane. (Kiritsuke zane is the method—rather common from the latter part of the sixteenth century—of cutting the tops of solid lames to resemble boards made of built-up scales.)
The second type of scale is called iyo zane. Unlike hon kozane, which overlap for half or two-thirds of their width, iyo zane only overlap by the merest fraction of their width, at their edges. Fewer are required to make an armour, so they are also obviously easier to make. On the other hand, given the lack of overlap, they aren't as sturdy as hon kozane.
Many armours in the latter part of the sixteenth century were made with a combination of the two. In such armours, the dō was typically the section made in iyo zane, and then the dangly bits—the kuzasuri, sode, shikoro, etc.—were in hon kozane. It never was done the other way to my knowledge. (In a similar vein, armourers making dō of solid plate or lames often fitted them with iyo zane dangly bits.)
Hon Kozane
Appearance

The earliest kozane were flat, and so may be spoken of as hira zane. In the fourteenth or fifteenth century, armourers took to laying a deeper amount of lacquer on the outside edge of the scale to increase its profile. This built-up layer of lacquer gave the scale its name: moriage zane. After that, virtually all armours were made with moriage zane. I wouldn't recommend trying this, however; lacquer is expensive, hard to obtain, and did I mention that it's toxic? Playing with lacquer gives you the skin rash from Hell. Don't make yourself crazy.
Earlier armours were also solidly lacquered. What I mean is, after the shita garami phase, if there was any forming required (say, for the kabuki-dō—the abdominal section of an armour), it would take place now, while there is some semblance of flexibility. Afterwards, there will be little at all. The boards were then lacquered (over and over and over and...) until the boards were heavy and rigid, capable of delivering severe blunt trauma injury if dropped on the unsuspecting toe. Only after this lacquering were the boards laced to each other vertically with suspensory braid.
Later armours were typically lacquered while still in the scale phase (witness the moriage zane), and then underwent the shita garami process. Where rigidity was required—especially in the dangly bits—the lower half of the boards was subsequently lacquered as well. The torso section of armours might be left without that second series application of lacquer: instead, shiki (metal or leather rods laced into place behind the upper set of shita garami) were used behind the scales to hold any shape needed.

Many earlier armours, made when supplies of good leather were uncertain, were made of a scale construction called mitsume zane. Mitsume zane are half-again broader than conventional scales and have three rows of holes for lacing and shita garami as they overlap two scales instead of one.
Early armours were often made of alternating scales (leather, metal, leather, metal...) to increase their defensive potential (metal) while keeping the weight down (leather). By the 1500s, this technique was pretty much history as metal was more easily refined and more readily available. Metal armours was more needed in later periods, but leather scales remained in use.
Unlike iyo zane, there are actually three different kozane for each pattern. There is the key scale pattern, which is the one repeated over and over; then there are the leading scales and the trailing scales. These are both half the width of the key scale. The leading scale is the left-most one (as you look at the scale board), i.e., the top-most scale. The trailing scale is the bottom-most and is placed under the last scale on your right and is not visible. These exist to make sure the pattern is even. (If you are using Noble Plastics kozane, these are readily constructed by taking a single kozane and cutting it in half vertically.)

There are, in addition, two more scale forms. Both of these use the key pattern as their source. One, the menashi ("eyeless") zane, omits the top three holes. The other form is the yotsume ("four-eyes") zane, which has six holes at the top instead of five. (These both have corresponding end scales as well.)
The menashi zane is used where the scales are overlapped by other plates. In early armours—especially ō-yoroi—many plates have a leather-covered wooden strip that overlaps the top of the first row of scales. Later armours didn't incorporate such features.
The yotsume zane are more common with later armours. Like menashi zane, these are invariably only used only as the top row of scales, but whenever they attach to a plate under them (such as the munaita, the kanmuri ita, etc.).

The menashi zane and yotsume zane are always flat, while all kozane following the key pattern are bent inwards slightly on the leading edge. This is the underlapping edge, and the bend is designed to help allow the lacing to slip between the two scales and enter its hole. You can bend in the edge of Noble Plastics kozane if you wish but given their slight flexibility that may not be necessary.
Construction
Armours of hon kozane look spectacular if you do them right. Scale (no pun intended) is possibly the most important factor. They have to be the right size and proportion to the armour you are making and the lacing you are using. A late-Period dō-maru of broad scales is just wrong, for example. The kozane got smaller as the years went along. You have to keep in mind what you intend to do and realize that if you want to make an entire armour of late-Period style using hon kozane, you will be spending many hours sitting punching holes in scales.
I am assuming you will be making an armour of hira zane (moriage zane are too much of a hassle). The techniques I will describe will work for everything from an ō-yoroi to a late-period maru-dō. The details will vary, but the methods of construction are remarkably similar. The first issue is size of your kozane. Keep in mind the armour you wish to build and use this as a stepping stone.
The first thing you will need to do is map out your armour carefully. Will your armour be early period (flat scales, with an expanding silhouette as the rows of scales go down), or later period (tapered scales, producing a tapered waist)? If you are going with later models, you can either taper the scales for your dō or try another period method, which is to warp each scale into a roughly S-shaped profile, so that the top protrudes and the lower part settles under the next row.
Cut out all your kozane, and make sure you have extras, just in case (or just order several hundred!). Decide which scales will occupy which positions and set aside those that will be either yotsume or menashi. Pattern out the entire armour on graph paper and note the scale count. Note where you will have to increase the number of scales or decrease them, as you will have to perform some lacing tricks here. These will be handled in the chapter on odoshi.
Make all your holes. This could take a while. This is why we have reruns on TV and videos. I find repeated watchings of Kagemusha to be inspirational.

This photograph shows two boards of kozane with shitagarami and the first few coats of lacquer. The smooth black lacquer has yet to be applied. The top board is the inside; the bottom is the outside.
If you're using plastic, you may want to heat them up just enough to give them a bit of flexibility, and bend the corner back slightly. You might even be able to do this over a candle flame, by holding the scale with two needle-nose pliers. Do not do this with any scales intended for the top rows if they will attach to another plate. Of course, scales for the top row of kusazuri will be bent back as they are pendant from suspensory braid, not attached to a solid plate.
If you're curving boards, you can heat the scales before assembly and give them a slight (don't overdo this!) curve. This is really only necessary with broader scales, however, as a shiki will be sufficient for projects utilizing narrower scales. This is unnecessary with Noble Plastics kozane.
Set your rows of scales up and do the shita garami. If you're doing real shita garami, you may want to put a small strip of 16-gauge steel behind each board as a shiki.
This is really all there is for hon kozane construction. The rest is all odoshi.
Iyo Zane
Appearance
Iyo zane are easily recognized by the broad surface they display, in contrast to the zig-zag toothy look of hon kozane.

There is a wide variety of decorative heads for iyo zane. The most common, however, seems to be the koishi gashira (the "double hump" shown in the iyo zane pattern). Other common heads are the yahazu gashira, which looks like an arrow nock (i.e., a V-shaped notch cut out of the center), the kozane gashira (where the scale is cut to imitate the silhouette of two or more hon kozane), the goishi gashira (named for stones in the game go, where the head is a single semi-circle), and the goirin gashira (which looks like a triangle with the head cut off), but iyo zane can even be left flat and level (an ichimonji gashira).
Iyo zane are first tied together into boards of appropriate length by shita garami along their bottom half. They are then given a coating of lacquer, and the entire board is pasted over with a sheet of thin leather. For this purpose, dogskin has always been the preferred medium, as it is quite thin and supple. (Please don't send me hate letters: I like dogs. I'm just telling you the way it's officially done.) The holes for the kedate and nawame garami are next poked into the leather. This whole is then lacquered over, making the board a solid whole which can now be laced to other boards so constructed.
Sometimes, dō of iyo zane are covered with more leather and lacquered over leaving a smooth surface and making them into hotoke dō which can't be identified as scale constructions. While I admit I've always wanted to do something anally authentic like that, I can't see the logic in spending that kind of time on scale construction only to cover it all with leather and lacquer.
A very common use for iyo zane is haidate. In this case, they're usually either ichimonji gashira or goishi gashira iyo zane. See the chapter "The Haidate" for details on this particular type of scale and construction, as the scales are slightly different in actual execution.
Construction
Making boards of iyo zane is, as scale construction goes, relatively painless. It might dress up an otherwise plain armour to have the "dangly bits" (kusazuri, shikoro, and sode) made of iyo zane in contrast to a solid-plate cuirass.

For SCA purposes, the easiest way to do it would be to lace the scales together with shita garami to the width of the board you require. Unlike hon kozane, where an armourer has to use entire scales, with iyo zane you have the option of cutting the edges wherever you need them. Take a look at any suit made of iyo zane and you will notice that not much attention was paid to lining up the scales. Indeed, the randomness of the pattern is part of the appeal. To make the boards fit, one may need to be a quarter-inch narrower than another. Just cut off the edge and don't worry about it. The lacing lines up; the ends of the boards line up; the scales themselves need not.

The best medium for shita garami is, as mentioned above, deer hide. Cut two 3/16" strips of the necessary length. You should definitely use a shiki with iyo zane boards. Don't take chances that the board might go limp. If I were making a combat armour of iyo zane, I might even lace the shitagarami to an inch-wide strip of 16-gauge steel instead of just a shiki, or even actually rivet the iyo zane to the inch-wide "shiki," thus making a more structurally sound construction.
Don't punch the holes for the lacing until the boards have been assembled by the shitagarami. After assembling the boards, but before applying the leather, you should lay them out in the manner they will be worn or used and mark the locations for the holes by tracing lines along the boards with your trusty Sharpie. Open your holes and make them a smidge larger than you may need, owing to the leather covering that you will apply.
This is pretty much the regulation method up to the dog hide. Since I'm assuming you won't want to use this material, you can substitute some very thin (garment weight or lighter—I recommend "garment lining" weight) leather. Liberally coat your board with Barge Cement (or some other phenomenally strong leather glue) and glue it down. Be sure to press the leather into all the crevasses and folds and be sure to detail the shitagarami. Once the front has dried, pull the leather around the edges and make sure that the back is also covered.
The easiest way to do this is to also cut a separate piece of leather for the back of each board, which overlaps slightly the edges you pulled under from the front. Don't attach the back until after the glue has fully dried.
Using a sharp X-Acto knife blade (the #11 is perfect for this) cut small holes in the leather where the holes for the lacing will go. Put a bit of glue inside the edges of the hole, and with a pointed dowel force the leather "down" onto and into the openings. After the board has had time to dry (give it a day or two, don't take a chance), you can choose to paint it with our usual medium: Rust-Oleum spray paint. You can also leave it alone, if you wish. More than one armour seems to have been covered with leather and simply dyed.
Kiritsuke Zane
Appearance
Kiritsuke zane, when properly done, is almost indistinguishable from hon kozane unless looked at up close. The less expensive forms are just metal or leather boards with a saw-tooth or zig-zag cut along the top to give the appearance of scale construction. Obviously, these aren't the ones that would fool the experts.
Unlike iyo zane, kiritsuke must be laced in kebiki or the illusion is pointless. As with real scale armours, the width of your cuts must be regulated by the width of your lacing material. If your braid is 1/4" wide, the width of each "tooth"—the dehaba—should be a shade less than that.
Construction

There are several methods of constructing kiritsuke zane. Although originals were usually built up with successive applications of lacquer or paste in the manner of moriage zane, I prefer a simpler method which was taught to me by an armourer in Haramachi in the north of Japan.
Start with 10-ounce leather—the same weight from which you might make a belt. Cut your "boards" to the appropriate shapes and lengths. Cut your zig-zags out of the top, keeping in mind your lacing width requirements.
Also cut a few million narrow strips about 1/8" wide and 1 1/2"long from the 10-oz. leather. Glue these "ribs" down with Barge Cement along what would be the trailing (or back) edge of the scales. (On what will be the bottom lame, the ribs must extend to the bottom edge of the lame, of course, so these must be cut to the width of your lame.) It is important to remember that there must be a rib at the very edge of the right side of the piece, and none at the edge of the left side (see the illustration below right). This is for normal plates (for the tateage and all dangly bits). The illustration below shows the process from square to "sculpted" strips on a panel of leather.

Wait for the glue to dry, then punch all your holes. Include small holes for one row of shitagarami, as you will definitely be needing a shiki here. These holes should be small, as you will be using artificial sinew. Note that the holes for the nawame and kedate are near the trailing edge of the rib rather than in the middle; this reflects the true position of the holes in hon kozane armours.
With an X-Acto knife, pare down the leading edge of the leather strips to resemble the overlay of a scale. You should also shave down and soften the other edges. This is the point at which you should put down the shiki for all but the bottom-most plates.

The illustration at the right shows the formed plates. The board on the left is representative of plates that don't have hinge-ends, such as plates on the tateage (the breast and back plates), sode, and kusazuri. The board on the right is typical of those with a hinge end (such as the body of the dō), and as such are thicker to accommodate the hinge. Note that only the end that takes the hinge is actually full thickness and expanded in this way. For torso plates that are being hinged, the left-edge rib must be half an inch wide instead of the usual width to provide a grounding for the hinge. Note that the right edge of the torso plate that butts against this plate must also have a half-inch wide rib; this is unlike normal plates.

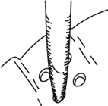
Take a shiki and bend it to the shape you want the plate to take and stitch the shiki to the plate with the artificial sinew. The shiki should be about 3/8" shorter than the lame as you don’t want it showing or poking out on the ends. Coat the lower half of the back of the lame—the part covering the shiki—with Barge Cement and put an inch-wide strip of cloth over it (muslin is perfectly fine). For the bottom-most plates, the ones that are fully ribbed, you must do the shiki first. It's hard to stitch the shiki into place with ribs over the surface of the leather. The photo at left shows the effect of a shiki on the underside of a lacquered leather plate.
Now comes the hard part.
If you have access to real lacquer, and are indeed a masochist, start lacquering. Layer after layer, sanding the piece down between coats. I've never tried using conventional paint for this, but I imagine the result would be similar. You can also give it about half a dozen layers of polyurethane coating and then paint that with Rust-Oleum. This will serve to make the leather surprisingly rigid. Make sure that each coat is dry before you touch it and begin work on the next; fingerprints are a pain in the neck, and you will end up hating yourself.
This is a very tedious armour to make, but the effect can be stunning. Such an armour is typical of the more expensive suits made in the latter part of the sixteenth century. If you want, you can also make an armour of pseudo iyo zane construction using this built-up leather method. I don't think you'd want to fight in such a suit, but it would look impressive.
For a dō made of iyo zane, you can use this building-up technique to make really impressive looking dangly bits to finish the suit. For dō of conventional plates, dangly bits of iyo zane add quite a bit of flair.
If you want to make an armour of kiritsuke zane for SCA combat, 18-gauge steel lames would be your best choice, and just cut the plates to resemble the heads of kozane, shape them, paint them, and lace them up. If you want to take your time, you can cut your kiritsuke zane heads out of 18-gauge lames, then hammer ribs into the plates.