
Chapter Eleven:
The Kote
History
Up to the twelfth century, warriors only wore a single armoured sleeve, and that was on their left arm. This was more to get the bulky armour robe sleeve out of the way of the bowstring than for protection. Sometime in the late 1100s, matching sleeves for left and right began to appear.
I will cover a typical early kote and a typical late-Period kote here. You can extrapolate as you wish.
Kote and suneate are taken as en suite; that is, they are designed to match each other. Even though the plate shapes may be different, the color, decoration, and foundation fabrics are typically the same. (The same foundation fabric should also be used in the construction of the haidate.)
The older kote were baggier and came farther up on the chest, while kote of the fifteenth century onwards really were more like sleeves.
Styles
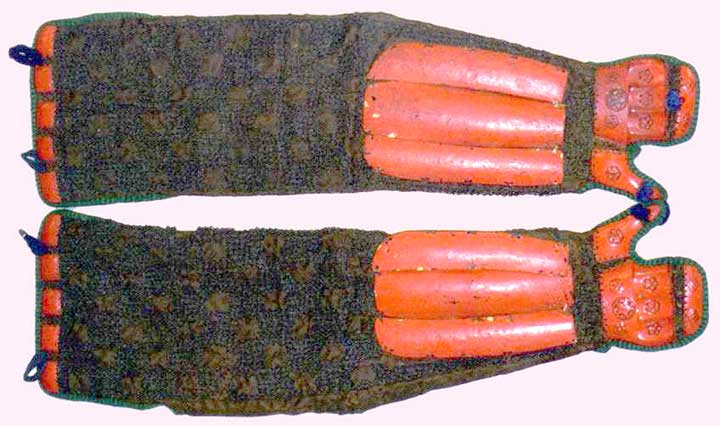
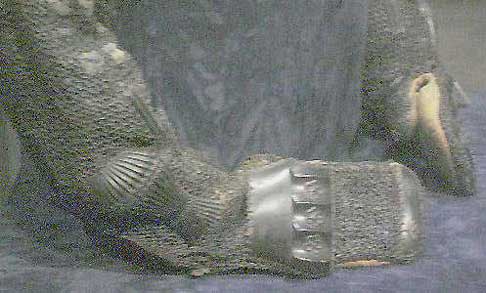
The so-called yoshitsune gote is named for the great tragic hero Minamoto no Yoshitsune, who, it is said, wore kote just like them. They are marked by a single plate on the forearm, a single plate on the upper arm, an elbow disc, and a D-shaped tekkō. This is an older pattern typical from the eleventh century. By the 1500s, it was out of favor as all but a curio.

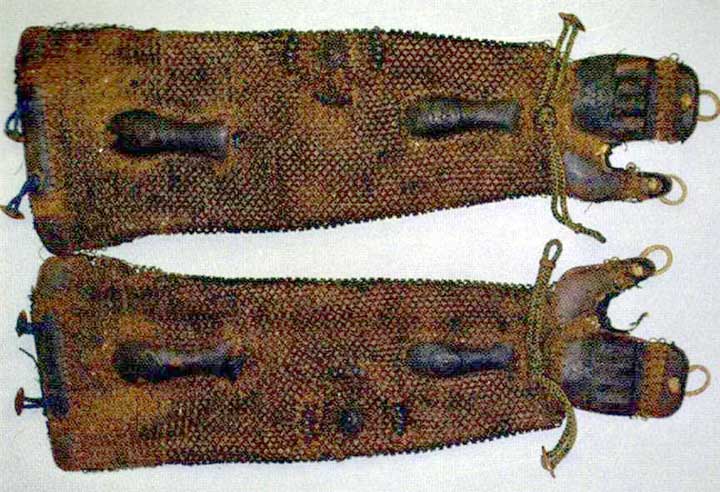
A typical early yoshitsune-gote. Note the baglike sleeves. Early kote were not worn in pairs; there was only the one for the left arm.
The namesake of the yoshitsune-gote. The property of Itsukushima Jinja, these kote were supposedly worn by Minamoto no Yoshitsune, although they postdate him by a century or so.
The original, older models used the old-fashioned kote bukuro (kote-bag) fabric pattern. Later period models (fifteenth century on) used the newer, tighter and shorter, pattern. One of the biggest differences between kote of the early and later periods is that the earlier kote had to be donned before the cuirass, as the cuirass overlays the fabric; but the later kote could be donned after the dō as there was no overlap, and the kote actually are held on by frogs on the cuirass’s shoulder straps. Most later kote were also open along the underside, while earlier kote might have been sewn closed. Open ones have their edges tied shut by a running zig-zag of braid.
The earliest kote did not incorporate mail, but by the 1200s it was common to see mail connecting strips between plates. By the 1500s, mail was commonly part of the kote defenses, covering more of its surface, only interrupted for the plates.
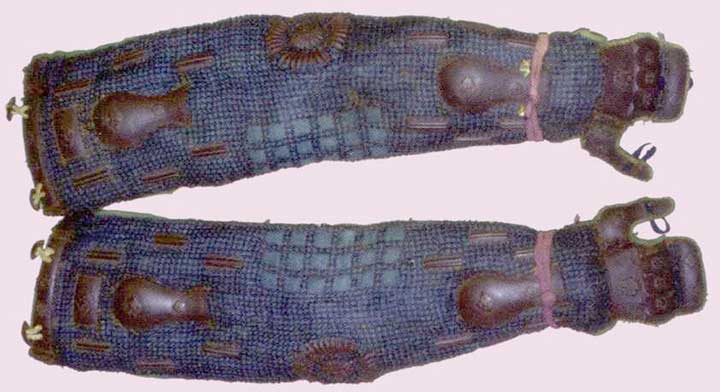
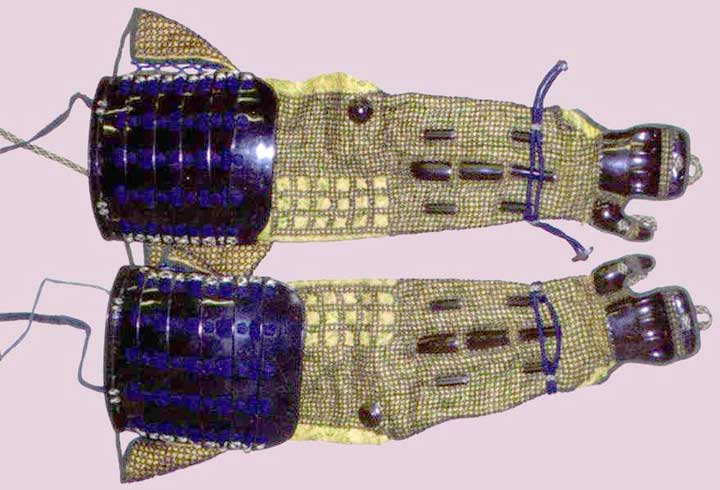
There are several primary styles of recognized kote during the Sengoku Period. The identification was derived from the pattern of the forearm, regardless of whether the kote was entirely of one style or actually a combination of others. For example, a bishamon gote, incorporating as it does the sode structurally into its own foundation, has no upper arm plates at all. Rather, it has the built-in sode.

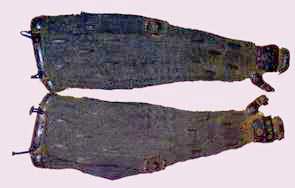
Bishamon-gote. The body is covered by mail, the foreams by splints.
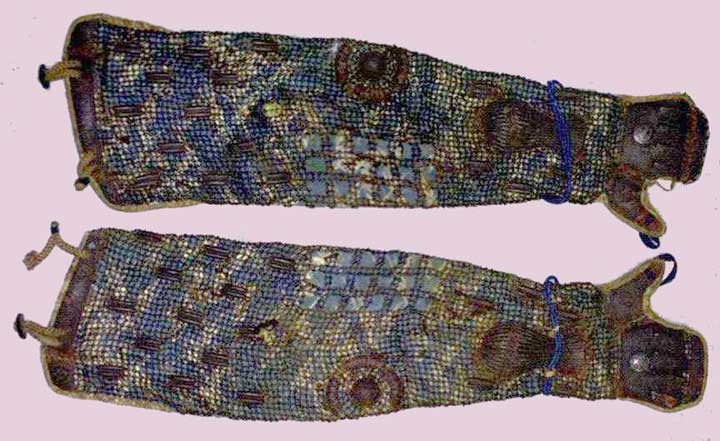
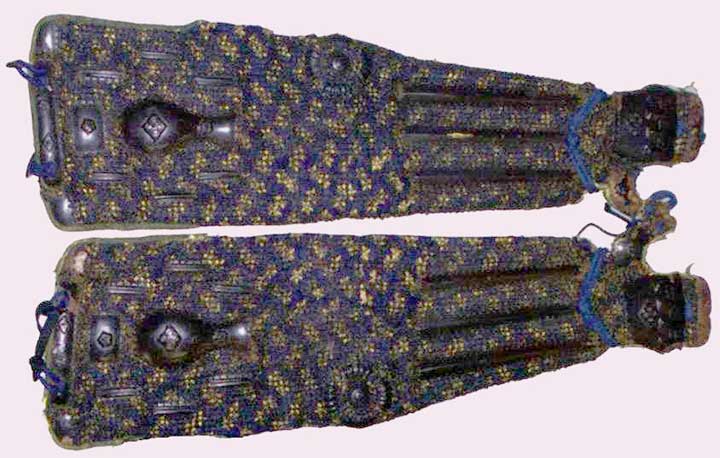
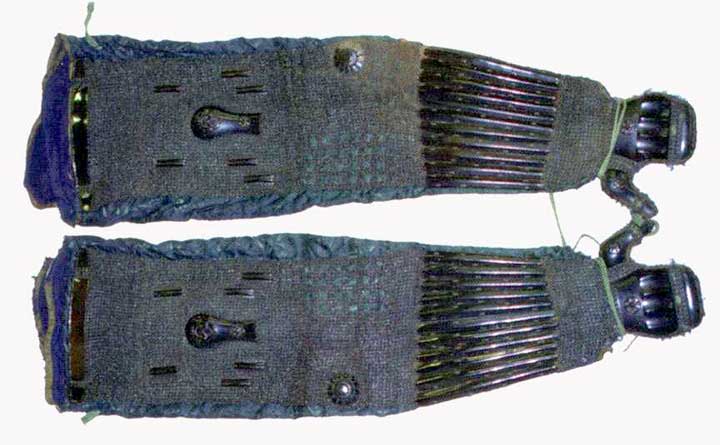
In the Sengoku period, shino- (“splint”) gote are the most common. The shino can be widely spaced or closely butted together; they can be narrow or broad. Shino can number from three to 11 or more, usually in odd numbers. They are held to the fabric by being stitched down through pairs of holes along their edges.

Typical shino-gote. The upper arm is covered by small plates.
Three or five broad shino, butting together, can nearly enclose the forearm in a solid tube. This is usually called a tsutsu- (“pipe”) gote.
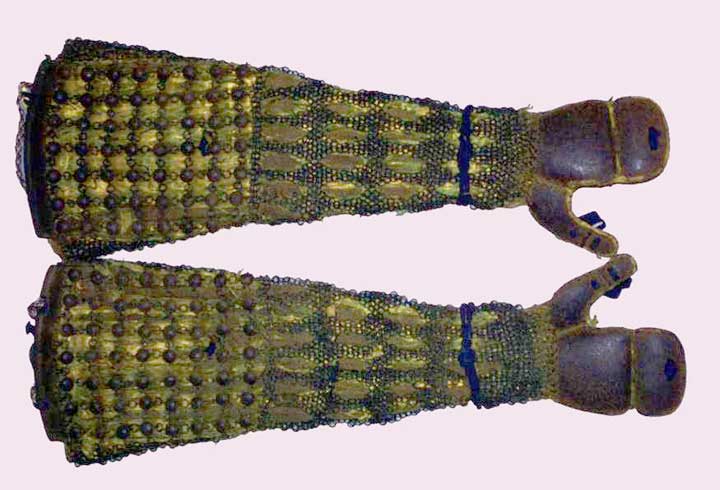
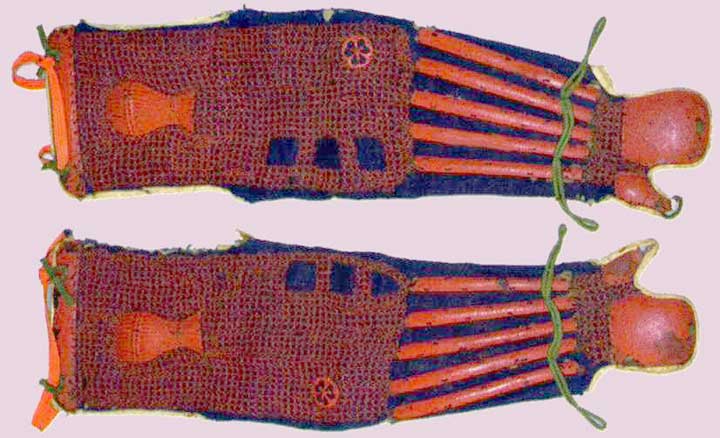
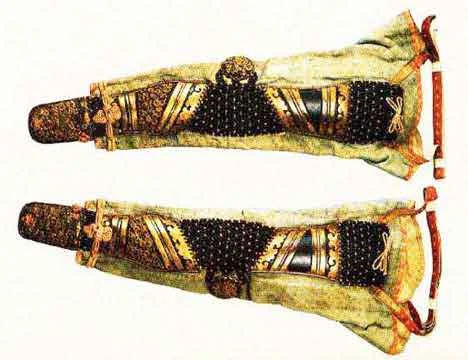
Oda gote, also called kaga gote, are named for the school (Oda) and region (Kaga) whence they originated. These are marked by gourd-shaped plates called hyōtan gane (lit. “gourd plates“) on the forearm and sometimes the upper arm as well. These plates are well dished, occasionally ribbed, and sometimes are hinged to open and reveal recesses for medicines or writing supplies. Since these plates are small, they are often surrounded by small rectangular pieces of metal called ikada (lit. “rafts“), floating in the mail. Oda gote are usually fairly well covered with mail.

Oda-gote. The hyōtan-gane are surrounded by ikada.
Tominaga gote are kote with an extended foundation that fits under the armour. It covers the shoulder and perhaps part of the side, similar to the older kotebukuro foundations common when yoshitsune-gote were being worn. It can be hot, and while protective it could be more restrictive and was not recommended by Sakakibara Kōzan. Tominaga refers, of course, to the style of the foundation, not the plates, so one can find tominaga gote of oda, shino or other styles.
An unusual form of kote, but one that may be of particular use to re-enactors, is the ubu-gote. This is essentially a brigandine version of a kote, in which the usual array of plates in a kote are sandwiched between the lining fabric and the facing fabric. With such a kote, plates can even be made of heavy plastic without resulting in any loss of visual appeal. Pictured below is a combination ubu-gote/bishamon-gote.

Tekkō (handguards) in early armours were a single plate called namazu gane (lit. “catfish plate,” as it is said to resemble the shape a catfish’s head) with no thumb guard. Such handguards were almost nonexistent by 1500. By this time, handguards had thumbs as well. The “standard” four part tekkō (back of the hand, knuckle-rider, back of thumb, thumb tip) is really not a universal standard, although it was the most common type. There are also three-plate models with a single plate for the whole thumb, and two-plate models with no jointed knuckle-rider and one-piece thumbs. These latter two may be considered retainer armour, but I’ve seen more than one expensive suit with the simple hand guards. These seem to fit the austere quality of yukinoshita dō. Indeed, one such example that comes to mind is a suit that belonged to the great Date Masamune.
Decoration
It was common to put the owner’s mon on the back of the tekkō by means of repoussée work, paint, built up in lacquer, or even applied metal pieces.
Some armourers used several colors of lacquer and even gold foil to make the kote look more impressive. The mail was typically black, but pierced iron medallions or ikada of gold or bright red might break up the mail surface.
Construction
Making It List-Legal?
It must be understood that as they are designed, kote are not safe/legal for some heavy combat (e.g. SCA). There is little in the way of hand protection, and the elbow only gets a touch of armour at the very point. Other than the open-face problem with the kabuto, this is the part where you will have to make the most concessions for lists-legal acceptability and safety, if you plan to make armour to be used in modern combat sports.
I’ve seen people put huge, wingless elbow cops on kote, but that to me is just wrong. If your preferred method is to attach such a real elbow protection, you should do so to the inside, stitching it by pairs of holes and artificial sinew to the lining. What I generally recommend, though, is wearing a sturdy elbow pad and covering that with a solid, wingless (of course!) elbow cop of leather, plastic, or metal, all worn under the kote.
So what about your forearm? Well, if you make a tsutsu gote, you’re fine, but the pattern here is for shino gote, the predominant style in the sixteenth century. If you are likely to get hit on the forearm, I recommend wearing some sort of solid vambrace under the kote. The armour should have forearm and elbow protection, and be close fitting with no edges to interfere with the fabric. I actually wear full, albeit somewhat abbreviated, “European” arm armour under my kote, which allows me to have a more ornamental and even less structurally sound kote.
An excellent protection under kote, in my mind, is a tight-fitting bazuband — an armour tube that covers the forearm and has a cupped riser that protects the elbow. This solves both of your problems, and allows you to wear an attractive and authentic kote.
Hand protection is just going to be a problem you’ll have to deal with. Some kote were made with removable tekkō that were held in place with two small frogs on the forearm, leaving the kote with a finished open wrist. These were usually Edo period constructions, but I’ve seen at least one that I know was made prior to 1600. I suggest this method be employed, as you can have fancy kote that can be worn for dressing up as well as for combat (by substituting clamshell gauntlets for the handguards). I will here follow the construction of a regular (i.e., one-piece) kote, but I will provide directions for making the tekkō removable. Below is a rare kote with full mitten hands.
First Steps
You will have to decide first if your sleeve will incorporate mail or not. If it does, read the section on mail in the Chapter “Before Beginning” and make your mail first. Don’t bother “weaving” the mail yet, but have your links ready.
Test the fabric pattern out before you do anything else. Cut a sleeve pattern out of light colored duck. Use duck as you’ll want it to have some body. This will also be your test-piece to check the layout of the plates and where you’ll need mail for your kote. Obviously, you’ll only mark and use one side, and mirror-reverse it for the other arm. Cut one set of plates for your kote out of metal (although you could use the posterboard matrices, if you wish). Note that there is no seam allowance required. There are no seams per se.
Since the open underside of finished kote should either just fit edge-to-edge or gap ever so slightly, butt the edges of the fabric and run a strip of duct tape (no, I’m not kidding) along the “seam.” Remember that you want the sleeve to have a slight amount of bulk, so don’t try to make it too snug.
Note that the pattern has no set hand, just a great whopping piece of fabric flapping in the breeze. This is because you cut the hand pattern in the cloth after making the hand armour, and after you’ve put the hand armour down on the fabric.
Pull the sleeve on and bend your arm very slightly — just enough to help you find your elbow — and mark the very tip of your elbow with a Sharpie. Straighten your arm and mark where your hand comes to, and roughly trace the outline of the back of your open hand. This trace should roughly replicate the shape of a tekkō. Take the sleeve off, and cut close to (but not right on) the marks for the back of your hand. You may need to do this three or four times, getting closer and closer to the correct position, until you have it just right. When you have the position just right, lay the tekkō down, trace around your tekkō plates, and cut away the excess fabric at the hand.
Lay the still-closed sleeve flat, with the seam on the bottom. Now lay your plates on the fabric. This is where you test the sleeve to make sure it will work. It’s also how you determine the patches of mail you will need. Small strips of duct tape will help you hold the plates down. You might have to manhandle the fabric - especially if some of the plates wrap a bit - but secure them in place.
Try the sleeve on again, and check that you can move properly. If not, remove the sleeve and move or trim the plates as necessary. Once you’re satisfied with the plate arrangement and placement, remove the duct tape and open up the back seam. Lay the fabric out flat with your plates still in place. Trace around the plates with a Sharpie and remove them. You now have your plate matrix for this and future kote. If you’re incorporating mail, use the Sharpie to mark off areas for mail panels. This becomes your mail matrix.
If you’re impatient, you can go right to the real kote without making this test sleeve; you can do it directly on the foundation fabric. After you’ve made a few kote, you should be able to do this easily, but for your first pair I’d suggest not skipping this intermediary step.
You’re now ready to move on to the actual construction of your kote.
Fabric

Cut your cloth pattern out of three different sets of fabric for each kote you are going to be making, as per the explanation given in the chapter “Before Beginning.” One layer of fabric is the ieji (i.e., the “foundation” or facing cloth, which is also the foundation fabric for your suneate and haidate). The second layer adds more body. The final layer is the inner lining.
Cut the patterns out. Sandwich the fabric properly and run a stitch around the very edge. This will be covered with bias tape; don’t worry about the way it looks. If you’re doing the kote directly from the supplied pattern, you won’t be cutting the hand section until after making the hand armour, and after you’ve put the hand armour down on the fabric. Put the fabric aside for now. We’ll come back to it later.
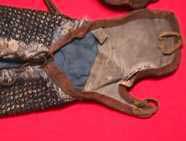
Many kote were lined behind the tekkō with deerhide. Note the illustration above left for the detail.
Metal Bits


You need to use a good, solid metal for the kote, although you can probably make do with cuir bouilli if you paint it black to resemble lacquered leather. I’d suggest using leather only if you’re going to wear solid arm armour under the kote. If you’re making a dress armour, 20-gauge steel is fine. If this is for combat, you might want to make the permanent plates of 14-gauge steel and the temporary ones (i.e., the removable tekkō) of 18 gauge. You’ll want to use heavier steel to withstand the beating.
Cut two sets of plates from the pattern, one for the left kote and one for the right. Mark them so you don’t accidentally form two sets of plates for the same arm. I’ve done this.
Before doing anything else, mark and punch or drill all the holes. Be careful to open only the holes you need. You will need pairs of holes along the edge of plates to use to stitch them to the foundation, but you only need the holes for your mail if you are using mail, and only where you are using it. At any rate, you should not punch the holes for the mail till near the end of the process.
Make your mail panels according to your pattern.
Put a slight lengthwise curve in the shino. Dish the elbow plate. Form the tekkō.
Paint all your metal bits.


Attach the mail (if any) to the plates. Lay the plates and the mail on the foundation fabric. Using red embroidery floss (or a color matching your “lacquer”), sew the mail and plates to the foundation in a series of knots all along the edges and at a few dozen other places.
If you’re making a yoshitsune gote with no mail, don’t punch holes in the edge of the plates for mail; just punch pairs of holes for tying the plates to the foundation fabric.
Cut the foundation around the hand so that it is close to the tekkō. Sew a broad strip of black bias tape all along the edges of the foundation, and up over the tekkō edges (see the illustration). This only holds for “modern” kote; if you are making a yoshitsune gote, run the bias edging on the foundation only, as the tekkō sits on and is stitched to the foundation in the same manner as the rest of the plates.
Ties and Cords

Along the underside of the arm, sew several loops of rattail trim. A better method may be to sew a long strip so that loops emerge all up and down the opening. This is to tie the sleeve closed. You must thread a second strip of narrow cord about four feet long through the loops after the manner of lacing a shoe. This enables you to tighten and loosen the sleeve. The loose ends must be at the wrist and should be long enough to wrap around your wrist four or five times and tie a knot.
A small loop through the thumb joint and a second between knuckle-rider and hand plates serves to hold the tekkō to your hand.
Yoshitsune-gote are worn under the armour, and so are donned before the cuirass. It has one or two pairs of cords extending from the upper surface to hold it on. If there is one set of cords, they will emerge from the edges and tie under the opposite arm. (This is identical to the fastening system of the archer’s sleeve, which is essentially a baggy kote without plates or tekkō.) You may find two pairs are both more stable and more comfortable. The second pair emerges from the front and back edges of the shoulderplate. These cords are tied closed at the far side of the neck (i.e., the left kote is tied under the right arm and right neck.)
Modern kote were designed to hold two frogs (the male end) issuing from the front and back of the shoulder plate. These frogs attach to the female-end frogs that are attached to the watagami (shoulder boards).

The inside of a pair of modern kote. Note the leather “lining” of the tekkō and the cord that ties the sides together.
Removable Tekkō
The photograph here shows an extant kote without tekkō. The style is sparce mail connecting a small number of ikada.
For this model, you must finish the fabric around your wrist like it is a normal, long sleeve. The tekkō is attached to a panel of fabric that fits over this like the gauntlet of a glove. The best way to do this is to make a metal strip about 2“-long and wide enough to circle your wrist. Round the corners; you don’t want sharp edges here. Form it into an oval but don’t rivet or otherwise seal it; leave it so your hand can enter it like a bracelet. Cover this strip, both inside and out, with fabric (gluing it on is fine), to which you attach the tekkō in the normal manner, as if it were the end of a kote.
Add the male section of two frogs at the back of the wrist. Attach the female part of the frogs to the kote proper. A tie (two cords, one on either end) at the open wrist section finishes off this part.
For dress, put on the tekkō, fastening them to the kote with the frogs, and tighten the wrist with the cords. For combat, remove the tekkō and put on combat gauntlets.
Clamshell Gauntlets
I am not going to provide patterns for these, as clamshell gauntlet patterns are a dime a dozen. They aren’t strictly Japanese, either, but there’s something you can do to dress them up. Paint the metal in the same color as your other plates, and you can even intersperse lacing among the lames to make it “look” more Japanese. Painting your mon on the back of the hand is another option that goes a long way to making the gauntlets aesthetically acceptable.
Oh, don’t forget to pad the inside of the wrists to prevent abrasion on the plates on the wrist of the kote.
Kote Gallery
The following graphics link to larger images (some are very large) which will pop up in a separate window so you can look at several kote.