

Chapter Three:
Before Beginning
This guide is primarily geared to those interested in making Japanese armour rather than just looking at it. If you are interested in making the armour, there are many things that you will have to understand before attempting it.
Some of the following material covers the basics on armour-making philosophy. Some of it is construction detail on items that are ubiquitous on Japanese armour — to the point that the details can’t be repeated half a dozen times in each chapter, nor explained in only one of them. Not all are complex enough for their own chapter, so I have put many of them here.
Terminology
As mentioned in the introduction, I prefer to use the Japanese terms for armour and the parts of armour as they are just more accurate and on the whole allow less possibility of misinterpreting what is meant. As you progress through this manual, you will become more familiar with what is what. When in doubt, consult the glossary.
In addition to the correct terminology, I will use a few terms that may be... ah, unconventional. The one you will notice most readily is “dangly bits.” That is my catch-all term for the shikoro, sode, kusazuri, and yodare kake. (If you aren’t familiar with these terms, don’t worry. You will be later.) These are all parts that hang off of other parts, and regardless of the style of armour are all usually made en suite. I find it odd that the Japanese never seemed to come up with a term to refer collectively to them (something like kake-mono?).
In regards to various measurements, they follow the US standards: inches for measurements of length, width, and height, and U.S. Standard Gauge for general sheet metal thickness (though our ancestors were rarely so precise). In addition, since this was originally intended for an SCA audience, many of the assumptions and terms in regards to practical use will be directed in that vein (e.g. a 16 ga minimum safety requirement for helmet thickness). In many cases, historical examples were much thinner, and you will need to determine how you intend for the armour to be used.
Tools
You will need the usual complement of armourer’s tools. In addition to a dishing stump, however, you might want a helmet form, which is described in the chapter “Making a Kabuto.” Your best friend will be a hole punch. While you can drill all the holes, a punch is probably going to be quicker (unless you have a drillpress and make a jig). Punches also leave neater holes than drills, and you won’t have to worry about filing all the burrs. I recommend the Roper-Whitney hole punch, which comes with several punching dies to make a variety of hole sizes.
The most important tools, however, are books. Read as much as you can on Japanese armour. In all modesty, I recommend my own four Osprey titles as good places to start to observe photos of many different styles and details of armour. I can’t stress enough how important it is to train your eye to what is correct stylistically and proportionally. Allow me to recount an anecdote told to me by a skilled armourer in the SCA:
Someone had come into a great deal of money, and wanted to get into armouring. He asked the armourer what tools he’d recommend, thinking he might suggest a plasma cutter or lathe or some such exotic power tool. The armourer suggested books. The would-be armourer said, in effect, “No, really. I want to be a good armourer. What do I need?” The armourer pointed out that if you know what you’re doing, you know the armour, and you understand it, you can do your work with a hammer, some files, and a hacksaw if you have to. No amount of high-tech, expensive tools can help you if your proportions are wrong, your styles are inconsistent, or your patterns don’t reflect historical reality.
I concur. Although I don’t expect many people will have the same resources I do, there’s no excuse for not looking closely at what you have. I’ve seen far too many suits of armour that are Japanese only because the maker says so, which bear little resemblance to the real McCoy. Likewise, I’ve seen many suits that were close to being good replicas, but failed the test in one or two critical points because the maker didn’t look closely enough at the original models.
Size
Something that you will have to decide when you begin is the scale issue. By this, I don’t mean lamellar scale. I mean size scale. If you cut your kozane (scales) or plates to the same size as the Japanese originals, the armour will not look proper on the average American. There is more to it than just adding scales or inches for girth. Modern Americans are much taller than the Japanese warrior of the fifteenth century. One ō-yoroi in the Tōkyō National Museum looks like it was made for a 12 year old, but it was an adult’s armour.
The bottom-most row of scales in ō-yoroi will reach the knees of a 5' 3" man, but be mid-thigh for someone six feet tall. You have the choice of adding additional rows to make the armour sit where it should, or making the pieces larger to suit your own body size. Working with plate armours, this isn’t as much of a problem (just cut larger!) as it is when one works with lamellar armour, but it is something that you should keep in mind. Is the accurate silhouette more important than accurate reproduction? Are you making a museum replica, or something to wear?
My solution, no matter how odd it might look to one used to the scale of the originals, is to scale all the parts up so that the object will look the same on a modern, larger body as the original would have on the original, smaller body. Nevertheless, I don’t force my aesthetics on others. This is a decision I have made — you may feel differently.
Kanamono
The term kanamono refers to the various small metal plates that decorate and hold the armour together, the various rivets, and the ornaments.
Plates

The most common kanamono plates are the hassō kanamono, the ornamental, etched (and usually gilded) copper plates that serve as seats for the hassō byō that hold the cuirass to the munaita and wakiita, and in other places. There are two forms of hassō kanamono: one for the ends, and one for the middle. The hassō kanamono is really little more than an elaborately designed washer on steroids.

Click to view PDF…
They are more ornamental than structural, and if you are making a combat armour, especially one that consciously imitates the style of a munitions or retainer-grade armour, you might want to eschew them altogether. If you plan to use them, you’ll need quite a few. For a dō, you’ll need between six and twelve (that’s two ends and a middle per set), depending on the style of armour you’re making. In fact, as mentioned above, you might not even want to use hassō kanamono.
Cut the hassō kanamono out of sheet brass (18 or 20 gauge is fine), and punch the holes for the ornamental rivets. You may curve them ever so slightly as per the pattern or not — it is a stylistic matter that is up to you. The heart-shaped section is called an inome (lit. “boar’s eye”), and is a common decorative motif. It can be made by drilling two small holes and filing away the remainder. This is also how you will make the rather baroque curves and angles at the edges.
Suemon kanamono are largish ornamental plates that either represent the heraldic crest or are the heraldic crest of the owner of the armour, or just look like a whopping great chrysanthemum. Their most common form is a cast or embossed gilt copper disk applied to the blowbacks on the helmet. These typically have one or more sets of split-shanks welded to their backs to enable them to remain on their plates.
Another item is the kōgai kanamono (see below), which is attached to the back end of the sode and from which hangs a ring. This is made similarly to the hassō kanamono, only it is longer and takes two pairs of hassō byō (in earlier models) and one pair (in later models).
Fukurin
Fukurin are the ornamental rims on the kanagu mawari. (Kanagu mawari is a term for all the metal pieces such as kanmuri ita, munaita, wakiita, etc., distinguishing these pieces from the rest of the armour as they were originally solid metal plates while the rest of the armours were leather scales). Originally, fukurin were structural, as metal plates were all covered with printed leather on both the face and rear surfaces, and the fukurin helped to hold the leather in place and prevent the leather from peeling off. By the sixteenth century, when armours with printed leather panels were the exception rather than the rule, fukurin were no longer needed. They were still often applied, however, as an ornamental element. Less expensive armours had instead a lip of lacquer built up at the edges which was painted gold to imitate an applied fukurin. For later-period SCA combat armours, a rolled edge would imitate fukurin nicely.
Fukurin are held on by sheer pressure and one or two tiny (read: very tiny) rivets at their edges.
The problem with fukurin is that they are a bear to make. They have to fit the plates perfectly or they will neither hold nor stay in place. Considering that there are only a few “patterns” of plates being worked with, and an armourer might make as many as a dozen suits using the same pattern, the method of making fukurin makes sense — but to one who may make only one or two suits of Japanese armour, it seems wasteful. This, in short, is the process:

Assume the metal plate to recieve the fukurin is 16 gauge steel. You need to make another metal plate, exactly identical in measurement and formed out of 8 or 10 gauge. This has to be formed in the same way the final plate will be that is to say, dishing, curving, bending, etc. The fukurin has to fit exactly and follow every curve and warp. The thicker steel is to allow for the thickness of the leather. Cut the fukurin from 20 gauge copper or brass to the appropriate width (to allow about 1/8"-3/16" flap front and back, as well as allow for the thickness of the plate. The edges must have a slight wing on either side to accommodate the rivet. Heat the copper till it is malleable, and then clamp, mash, hammer, smash, and otherwise fold, spindle, and mutilate it until it is a good, tight fit. When it is cooled, remove it from the plate. You might have to pull carefully, as you’ll notice it’s almost spring-loaded. Put the heavy metal pattern away until next time. (You may now gild the fukurin if you wish.) When all the patterned leather is applied to the actual armour plate, work the fukurin on carefully, and use a rubber or rawhide mallet to “flatten” the fukurin into the surface. With a really tiny drill bit (1/16" or less), drill through the flanges and the plates all at once. Insert a tiny brass fastening pin (I use narrow brass wire) and rivet the fukurin in place. Ta da!
Rings
Rings are often used as ornamental and structural elements.
Kasajirushi-no-kan
One example is the kasajirushi-no-kan (lit. “hat-sign ring”), which is attached to the rear-most plate of multiplate helmets. Ostensibly, this is for a small paper or cloth flag that bears the owner’s crest or affiliation mark so that he can be identified by those behind him, but I’ve only seen a few cases of it being so used. Today, an agemaki bow usually hangs from this ring as a simple ornament. In late Period, it likely went unadorned, as just a vestigial remnant of an obsolete concept. Although true kasajirushi-no-kan were made with the ring attached to a largish metal cylander which itself was attached to the kabuto, you can probably get by with a true ring hanging off a much smaller ring fastener, the latter really little more than a cotterpin. This item is also called kōshō-no-kan.
In photographs and in armour today we can often see on the left and right breast of many dō—looking like nothing so much as gilt, pierced nipples—two rings hanging from a similar arrangement as the kasajirushi-no-kan. These are both post-Period additions to armour, and serve no real function. One was said to be to hold a cloth to mop the face, and the other for holding a baton or signalling fan; in point of fact, they are either adorned with agemaki bows or left alone. I am used to seeing them since many surviving armours have them (and older armours were often retrofitted to when they came into fashion), but a whole spate of authors claim that they came into being in the seventeenth century, so I do not make them. If you want to make them, the formation is identical to the kasajirushi-no-kan.

A kōgai kanamono
Ō-sode (and some modern, smaller sode as well) had a ring attached to a metal fitting (this fitting is the above-mentioned kōgai kanamono) about halfway down their length. These rings overhang the back of the sode as shown here, and had cords hanging off them. The cords from the ō-sode were attached to the “wings” of the large agemaki bow worn at the back, this serving to help stabilize the bulky shoulder guards. These rings, too, were mated to a brass fitting like the kasajirushi-no-kan. In the chapter “The Sode” I offer a simple way to replicate them for practical use.
A holdover from the ancient ō-yoroi is the agemaki-no-kan, a ring attached to the upper-middle of the back. The original purpose of this ring was to bear a large, agemaki bow made of a heavy braid. When sode became smaller, the need for an agemaki-no-kan disappeared, but the fixture itself did not. What finally did it in was the use of sashimono, (banners attached to the back of the armour to identify troops). Banner fastenings and agemono-no-kan were contraindicated, so one had to go. Still, on armours of quality (especially hon kozane armours intended for the nobility) the old fashion remained. Sometimes, modern sode would be fitted with rings to enable the wearer to fasten a cord from them to the agemaki-no-kan.

Agemaki-no-kan
The pattern of the seat of the agemaki-no-kan is based on the armour’s hassō byō, which it replicates in a larger, heavier scale. If the hassō byō are chrysanthemoid, so will be the agemaki-no-kan; if the hassō byō are based on a geometric or other pattern, ditto the agemaki-no-kan.
Ring Fasteners

There are many places where you will need rings to use as fasteners. These rings are in essence large cotter pins. You must make them from brass bar stock. Stock of about 1/8" – 3/16" diameter is sufficient. Make these rings by bending the brass wire into a circle with an inner diameter of 3/4". The ends of the ring extend about 1" beyond. You will cut them to length after assigning them to whatever part of armour for which the ring is intended. The holes for these rings are typically oval, to accommodate the shape of the “legs.” You insert the legs through the holes and then spread them apart as if they were brads holding together sheets of paper.
Rivets
The Japanese used a dazzling array of rivets and rivet-like fasteners for their armour. Many were split shank, essentially similar to ornamental paper brads. If you can find split-shank rivets, wonderful. Your alternative is to have them cast, or create them yourself by taking a hacksaw to the shank of a conventional rivet.
Many times in the construction sections of this pamphlet, you may see the phrase “open the shank or pien the rivet over onto a narrow washer.” This narrow washer is just large enough to provide a grip on the inside surface of the item being rivetted. In such cases, the use of a washer is to be taken as an inauthentic nod to contemporary construction methods and the availability (or lack thereof) to the real thing.

Variety of hassō byō and details of construction.
Hassō byō is the technical term for the larger, ornamental rivets. These come in a dazzling array of styles. Many are floral in design. Many look like chrysanthemums—some abstract, some more realistic. The floral variety is often multi-leveled with several washers forming part of the design. Other hassō byō are heraldic, bearing the owner’s mon on the design.

Detail of the sakura byō
A type of smaller split-shanked rivet is the kozakura byō, which is used wherever there are metal plates covered with patterned leather. Although the leather is glued to the surface, the rivets help to hold it down. These rivets are star-shaped (well, actually they’re shaped like small cherry blossoms, but at that scale who can tell the difference?) when viewed from above, with the profile of a sharply domed rivet. They are hollow and stamped out of copper with the shanks welded inside of them. The hollowness enables the base of the rivet head to cut into the leather and hold it fast. I can’t recall seeing any cast examples. The star is on the face, the shank opened on the back. If you can’t get or make these rivets, a decent low-domed brass rivet with a longish, small-diameter shank will do. You can either use a hacksaw to split the shank, or you can clip the shank shorter and pien it over a small washer on the inside. You can grind or file the head of the rivet into a rough star shape if you wish.
For much of the armour, regular (read: tinner’s) rivets are fine. They will usually be ground flat as opposed to being allowed to protrude on the face of the plates, so they are obviously seated on the inside. You can also use clipped roofing nails, if you’d like. Only in a few instances would you used domed or button rivets.
Koboshi rivets are used in making certain helmet patterns. I’ve never found commercial rivets that duplicate their style; they are essentially button rivets, but the domes are tall and pointed. I discuss how to create them in the chapter “Making a Kabuto.” The huge, domed rivets seen in old style kabuto called ō-boshi are actually hollow, stamped from heated copper and attached to the surface of the helmet via long-shanked rivets. These styles of helmets do not figure into this manual, however.
Grommets
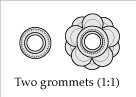
Za kanamono (grommets)
Za kanamono are grommets. They aren’t universally used, but in better armours, wherever a plate is pierced for a cord (except for odoshi, which does not need them), the hole is protected by a za kanamono. Some are very elaborate, others are simple rings in the same style as those that can be bought at any fabric or hobby store.
Kikkō
Japanese brigandine—called kikkō after its resemblance to the hexagonal pattern of a turtle’s shell—is ubiquitous in armour. Bits of kikkō are everywhere. It is found in the knee-guards of suneate, in the small “wings” sometimes used as shoulder defenses, the standing collar on some dō, etc.

It is really quite easy to make, albeit a bit tedious.
Make a pattern for your piece and cut three layers from fabric. You will use one surface fabric, one lining of thick, heavy canvas or burlap for body, and one layer for the backing cloth. In real models, a layer of thin paper is between the burlap and backing cloth. I use this paper as a pattern for the fabric and placement of plates.
Start with hexagons of metal cut to fit the pattern here displayed. Do not make kikkō larger than 3/4" across. Punch or drill four holes in each hex. Then put the plate on a shallow indentation on your dishing stump which is just wide enough to hold the plate (say, the diameter of a nickel) and about 3/16" deep. Whack the plate once, solidly, with the business-end of a ball pien hammer. Put that plate aside and do another one. Repeat as necessary. This part is quick and painless, and assuming you’ve got a decent stock of cut and punched plates, you can thwack enough for several suits of armour in just an hour.

Lay your lining cloth on a wooden surface, the hexes on the lining cloth, and the facing cloth over them. Note that you may have to cut some hexes into halves to fit the pattern. Never use less than half a hex, even if there is blank space. Take an awl and punch a hole through the fabric at every occurrence of a hole in the hex. Be careful that you open holes between threads, rather than cutting the threads, in the fabric. With one continuous strip of braid (which should match the color of the main lacing in the armour) begin lacing the tiny sandwiched plates by tying a knot under one hole and running the lace in and out. On the face you should make a cross-lace, while underneath the braid goes straight from hole to hole, plate to plate. The photo above shows a section of actual old kikkō from the surface, and the bottom (with the inner fabric lining removed so the details of the cording pattern can be seen).
When this is done, you must “outline” the plates with a contrasting color. I recommend a heavy silk embroidery floss. The traditional method is to run a pair of threads straight alongside each straight line. This is mirrored underneath by a rolled up strip of narrow paper (although I recommend using a long piece of simple twine). At each corner of the hex, run the two threads through the cloth, around the yarn (i.e., catching the yarn in the stitch) and run the threads back out the same corner and straight to the next corner. This looks great, but wouldn’t stand up to SCA heavy combat wear and tear. I recommend running a chainstich along between all the plates.
Only now do you put on the backing fabric and seal the edges by running bias tape around it.
Fabric Sections
Many parts of armour have a fabric underlay. The most notable are the kote, the haidate, and the suneate. Kikkō, however, is also built with a fabric base; the only difference is that the plates are inside the fabric rather than on it. All the foundation fabric is the same, and the pieces are all made en suite. The difference again is in kikkō, the surface fabric of which is always a solid color that complements the main foundation fabric. For example, if the foundation fabric is a dark blue on blue brocade, the kikkō foundation might be pale grey or blue, but not red or green.
Foundation fabric is called ieji. This term is usually given to mean only the facing fabric although many sources use it for the whole fabric sections that form a base for armour. Traditionally this was a damask or brocade of silk, but in Sengoku Japan simple hempen cloth came to predominate. For combat armours, I usually recommend a heavy broadcloth like Trigger for this layer, as it has the kind of survivability you want. Beneath this is a layer of good, strong canvas. This second layer is the “padding” although it doesn’t so much pad as add body. Traditionally it is a layer of coarse hempen cloth called saimi, which is like nothing so much as heavy burlap. A good weight of canvas or duck will work well for this layer, but if you can find burlap, why not use it? The earliest kote incorporated several layers of fabric as a sort of padding, and that is an option you may wish to consider.
The final layer is the inner lining. This, too, is usually hempen, but softer and finer. More expensive armours used silk crepe. A good light cotton fabric will be fine if you are thinking budget.
If you want printed patterns—mon or just decorative designs—on your ieji, you should print them before cutting the fabric out. Print them either with block printing methods or silk-screening. Be sure to wash all your fabric before you cut it. Since different fabrics have different properties, you’ll want all the shrinking and what not to take place before you put things together.
A simple running stitch along the outside edges (don’t bother turning anything under) is all you need to do, as all edges are covered with bias tape. If you can find nice thin black deerhide, great; if not, black or dark grey bias tape that extends about 1/4" – 1/2" from the edges will be perfect.
You won’t need to pad the fabric anymore, but if you wish you can put an extra layer or two of canvas in the haidate or suneate to add body to them.
The Japanese term for “mail” is kusari, which literally means “chain.” Japanese mail never exists in a vacuum; it is always stitched to a fabric or leather surface.
There are two primary types of links: round and oval. The rings that sit flat on the fabric are round, while those the join them are oval with an inner diameter just wide enough to allow them to clear the rings.
Japanese mail is incredibly delicate. The ring typically has an inner diameter of 1/8", and is the equivalent of about 18-gauge wire. The horizontal links are even more delicate—about 20 gauge or less. One form of mail uses a doubled horizontal link that is even finer.
All the Japanese mail I’ve seen is butted. You can go slightly larger, but on no account should a link be more than 1/4" interior diameter, or thicker than 16-gauge wire.
There were several different types of mail, as depicted in the accompanying illustration. In addition to these can be added the traditional, so-called international, or four-in-one mail. Four-in-one is called nanban-gusari, or “European mail.” I have seen no samples of this predating the mid-sixteenth century, so it is very likely that the Japanese adopted it from something brought over from Europe. Unlike European mail, which runs side to side, in Japan it hangs open.

The most common varieties of Japanese mail. Clockwise, from top right: kagomegata-gusari, hana-gusari, futae-gusari, kame-ko-gusari, kaushi-gusari, fusa-gusari. (Not shown: nanban-gusari, which is typical 4-in-1 “international” mail, hung open.) (Actual size; originals can be smaller.)
Use

Kusari is used primarily to span the junctions between plates on pieces of armour such the kote and suneate. It can also be used as pure defense. At left is one example of the plates joined by full application of mail, rather than an argubly more common use of “strips” of mail as seen in the photo at the right below. Both of these photographs are actual size.
I have seen suneate made entirely of kusari, and examples where the tateage were of kusari on fabric panels instead of kikkō. I have in my possession a set of kusazuri from a late sixteenth-century armour where, instead of suspensory lacing, the kusazuri hung off the dō by cloth panels covered with mail. Very protective, and quite distinctive.
The yodare kake (a sort of bib pendant from face or neck armour) can also be a single mail panel. In cases where panels are used in this fashion, it is almost always international mail rather than a domestic form, as part of the appeal is the “exotic” look.

On sections where there is a difference in spaces between plates (e.g., where two tapered plates have a fluctuating distance between their outer edges), armourers use different sized mail. They use still smaller rings and links to close narrower gaps.
Construction

The round links are done the normal way in a mandrel, using a 1/8" diameter rod. Cut them off and butt them all closed. You will be doing assembly using the oval crossing links.
The best way to do the crossing links is by welding two 1/8" diameter rods together and turning that in the mandrel. Before removing the links, lay the mandrel flat on an anvil and give the links a solid thwack or two with a hammer to flatten them out. Cut the links on the broad sides and open them slightly, making them look like staples.
Lay all your links flat on a newspaper and spray them with your finishing color. When dry, turn the links over and spray again. Wait for it all to dry. (For the crosslinks, I like thin anodized steel wire, as it already comes black.)
Put two circular links on one these staples and close it. Put a staple through one of those round links, add a round one to this staple, and close. Do it again and again and again. And again.

When your mail is done, if necessary, spread it out on a newspaper and spray it with paint. After it’s dried, pick it up and manipulate the mail to break up any sticking.
Mail is attached to fabric surfaces by sewing a thread up through the cloth and over the staple link and back down into the cloth. The photo here shows mail at nearly twice actual size (blown up for the detail).
Patterned Leather
Patterned leather—called egawa—plays an important part in Japanese armour. Many plates are covered by it, while other items use it to add integral strength. Patterned leather is made from white doeskin, with the rougher surface being used as the outside, although you can get away with using white cowhide of about 4-5 oz. in weight.


There are some dozen recognized patterns of egawa, only a few of which are presented above. The button at right links to a PDF showing the actual size of the printed pattern. The normal color of dyed leather is dark blue, almost a black, with highlights or scattered details in red. In older suits, designers would take care that the the pattern matched the shape of the piece being needed (e.g., a small dragon centered vertically on a tall, thin plate; two dragons horizontally on a long, thin one). In later years, the design of the leather had little bearing on the shape of the plate. Armourers try to center geometrics, of course, but many designs are just random patterns intended to provide some personality to the surface.
Two of the most common patterns toward the end of the sixteenth century is the so-called Shōhei-gawa and Tenpyō-gawa. These leathers are so named because they repeatedly bear the inscription “6th year of Shōhei” (the former) and “8th month, 12th year of Tenpyō” (the latter). Usually, these were used for the backing of plates, while a more neat geometrically balanced pattern was used for the facing of plates.

Printed leather is almost always edged by a narrow, black (or possibly red, in earlier days) leather strip called koberi. The look is similar to bias tape edging the leather. Koberi is about 1/2” wide. The usual appearance is a repeated white motif on black. The most common syle in the sixteenth century is a cruciform shape emerging from a sheaf of grass. This is called shobugawa, and the name is often used to identify all leathers similarly printed. In an armour you intend to fight in, I couldn’t blame you for “cheating” by painting or dyeing the koberi on to the edge of what is to be a printed panel. I’ve done the same thing (but don’t tell my teachers in Tōkyō).

In armours made by the book, these two leathers are sewn together in a painstaking and tedious process that produces what appears to be a multi-hued cord at their juncture called fusegumi. The typical number is three colors, though four and five are also recorded. See the illustration to see how the thread is sewn in and out of the two leathers. Modern reproduction armours don’t use real fusegumi; rather, they glue or stitch a narrow ornamental cord down on the juncture between the two leathers. This will not stand up as well under combat unless you stitch it down instead of gluing. At any rate, for an armour I intended to fight in, I would go the ersatz fusegumi route, sewing it to the surface.
Period egawa is made using thin metal stencils placed on the surface of the leather. The printer then forces die into the cavities, actually impressing the leather at the same time as it takes the ink. You could also use a silkscreen, which is essentially the modern method. I’ve been known to use the extremely fine Sharpie pens to draw the designs onto the leather. The blue Sharpie works quite acceptably.

This photograph shows a section of a printed leather panel from a haidate. All the features I have described above are clearly shown.
Kohaze
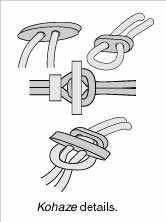
The standard fasteners are kohaze, which are roughly comparable to frogs. Kohaze are used to fasten the watagami to the munaita, the sode and kote to the watagami, and even removable tekkō to the kote proper.
Kohaze are made from two loops of cord. One passes through a wide “button” and forms the male end of the frog. The other loop passes through a smaller button which functions to tighten the grip of the loop on the male end. This loop is the female end. The loose ends of the loops are threaded through the panel or plate from which the frog issues.

To work the kohaze, merely slide the spacer button down the loop to open it to its widest aperture, insert the wider button, and slide the spacer down to close the loop so the male end can’t pull out. See the illustration to understand exactly how the kohaze functions.

The “buttons” are traditionally made from ivory, wood, or metal. You can use any source you want; I’ve seen some very nice ones made from a white plastic that imitates ivory quite nicely. If you choose to make them from wood, make sure that the grain runs across the button from tip to tip rather than along it (in the pattern illustration, that would make the grain run vertically) or you risk the wings of the button sheering off.
Knots
The agemaki bow (sometimes called a “butterfly knot”) is a common decorator of Japanese armour. It originally served a functional, rather than purely ornamental, purpose. When warriors wear ō-sode, they often find the armour’s bulky encumbrance difficult to deal with. For that reason, they wore an agemaki on their backs to help anchor the sode in place.
Long after it was necessary, the agemaki was still being used. By the sixteenth century, its most common use was as an ornamental device hanging from the kasajirushi-no-kan, to which it was fixed—rather ironically—to prevent the useless ring from jingling.
In the next century, when rings were also purposelessly attached to the front of the dō, agemaki were affixed to them to add to the ornamentation.
The agemaki on the back of an armour was typically made of heavy braided cord about half an inch in diameter, terminating in broad tassels, as the need was for mass. Other agemaki, more ornamental and less structural, were made of the same cord only of a narrower girth—typically 1/4“.
Tying the agemaki is easier to learn by looking at a diagram than reading a description. Rather than confuse you, I’ll just ask you to look below.

Detailing the Plates

Most modern armours are made of plates—lames—rather than scale. Even though many armours were made to imitate scale, they were solid plate at their core. To give a bit more personality to these plates, you may want to consider cutting them with a bit more panache. Specifically, rather than cutting them with straight edges, you may want to scallop them in one of the several recognized patterns used for that very purpose.
Usually one finds this in the torso plates for an okegawa-dō, but some kusazuri (and therefore, the sode made to match) were also so decorated. The typical pattern would be to either scallop the dō or the kusazuri—seldom were both done. Apparently, this was considered a sort of overkill.
Remember that such decoration only applies to the top line of the plates—the sides and bottoms were still straight lines.
Finishing the Plates
The problem with true Japanese lacquer—beyond its expense and the difficulty of working with it—is that it is incredibly toxic. Lacquer is the sap of a tree that is a close relative of poison oak. My teacher used to grease up with hand cream, wear thick rubber dishwashing gloves, goggles, and a respirator. Even when dry, there are problems. When I helped sand the lacquer down, even then I would suffer from what is called “urushi kabure” or “lacquer rash,” which results in cracked skin, blisters, and incredible itching—especially between the fingers.
Short of having access to real Japanese lacquer, or massive quantities of Cashew, a Japanese artificial lacquer, you will have to find a suitable product for giving the lacquered look. Whether you use lacquer, paint, or even big fat magic markers, I will generally use the verb “lacquer” to describe coloring the armour—but remember that in real armours, lacquer refers to the treated sap of the urushi tree, not to canned spray paint for automobiles and patio furniture.
I used to use Rust-Oleum brand paints and have long had a fondness for satin finishes. Three or four decent layers, sprayed on and allowed to dry, suffice. I have spoken with others who have gotten excellent results using thick, epoxy paints, and applying several layers to imitate the lacquerwork on their armours. If you are working with kozane, you might want to consider painting on a latex-based house-type paint with a brush, being extra careful to really lay it on thick over the bottom parts of the scales.
Another method which has gotten excellent results both in terms of appearance and ability to withstand punishment is powder-coating. This works very well, and I strongly advocate it.
The mail must also be lacquered. This holds true for plates whether leather or metal. If you are using plastic scales, it’s best to use plastic in the color you want the armour to be—painted plastic is just a pain.
The most common color, of course, is black. This is followed by a glossy brick red, a brighter crimson red, and a flat russet brown. It should go without saying that the Japanese did not have blue armour (for those of you who like to use plastic—be warned).