
Chapter Eighteen:
Chests and Stands
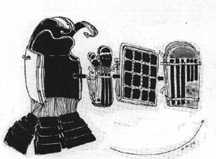
Despite what you may see in photographs from some museum exhibits, Japanese armour is not displayed on a full-body, mannequin-like stand. Armour is displayed on a demi-stand, which is usually placed on the armour’s storage chest.
The arm armour is tied to the stand or fastened to the watagami (whichever is appropriate); the haidate are tied around the top of the chest; the dō is put on the stand; the face armour is fastened on; kabuto are seated on the top; and finally the suneate are put in front of the chest. The impression one gets is of a fully armoured warrior sitting on the chest.
There are also stands for just the helmet, to allow only it to be shown.
I am assuming you will have some access to woodworking equipment, but you needn’t have the facilities of Norm Abrams at your disposal. Roy Underhill is perfectly fine...
Making an Armour Stand
The Real McCoy
The armour stand—or gusoku kake—is a fairly important item if you don’t want all your work to live in a box or armour bag when you’re not wearing it. There are more baroque models, but in the interest of your time and simplicity I will provide one that is relatively easy to make and could even be collapsible if you don’t use glue.
You don’t need nails or screws, but you will need a drill, a saw, a hammer, and a chisel. A router or a table saw are also useful, but not necessary.
You will need 50" of 2 x 4, 56 1/2" of 2 x 2, 9" of 1 x 1, and a 5"-diameter disk of 1 x 12. Any wood is acceptable, but pine is probably most readily available.

From the pattern and the illustration of the completed stand, it should be readily apparent as to the actual construction. To do the mortises and tenons, cut the ends down to 1" square. Open holes with a 1" diameter drillbit and use a chisel to square off the holes. You may glue the stand together (after assuring a clean fit of the pieces), or you may leave the glue out in the hopes it may break down and be reassembled over and over. I personally wouldn’t do this.
An alternative but inaccurate construction method is to eliminate the mortises and tenons entirely and use long screws (pre-drill those holes!) to secure the uprights to the shoulder board and base to hold it all together.
When you are satisfied with your stand, you can either stain it, seal it, or leave it a natural wood and let it develop a natural patina of age.
A Portable Model
The portable armour stand is of questionable origin, but it is what is supplied by some shops in Japan today if you buy a suit of armour from them.
It is a fairly easy item to make. The advantage with this model is that it breaks down and can be stored relatively flat in the armour chest for transport.
The stand is made entirely 3/8” plywood.


Simply transfer the pattern to your plywood and cut the pieces out. All the slots are wide enough to accommodate the plywood, of course. Sand or plane rounded the edges of the panels to avoid damaging the armour.
Note the method of assembly shown in the finished diagram at left.
While you can leave it natural wood, painting it black is a better choice. To make appearances better, I’d recommend draping the stand with a large, thin cloth before putting the armour on it.
Making a Kabuto Stand
The Real McCoy

The helmet stand—or kabuto kake—is very similar to the armour stand. In fact, it’s just slightly modified version of the top section with an abbreviated foot assembly.
When you place a kabuto on this stand, the single bar goes to the rear (as a shikoro support if necessary). The helmet cords go behind the horizontal bar, and back up (through the bottom slot) on the inside (as per the diagram) and then back to the front, where the cords are tied in an agemaki or a bow knot.

If you are putting a menpō on this stand as well, turn it around so that the single horizontal bar is in front; this holds the “nose” of the menpō. Place the menpō with the head cord over the top of the stand and put the kabuto on the stand to hold it in place. Instead of tying the cords to the horizontal bars, you will tie the cords to the menpō in the same way you would if you were wearing them.
A Portable Model

Like the portable armour stand, the portable helmet stand, construct this portable helmet stand of 38" plywood. Leave the stand natural wood or paint it a neutral black.
When displaying a helmet with such a stand, it is common to cover the stand with a good-sized cloth and then put the helmet on. (Presentation is everything.) The helmet cords are just tied in a knot and hang in front.

If you are displaying a menpō as well, put the menpō on first with the headcords over the top, then place the kabuto to hold the menpō down. Tie the helmet cords as if you were wearing the menpō.
An Armour Chest

There are several different kinds of armour chest, or gusoku bitsu. I am providing instructions for a reasonable facsimile of the most typical model for modern armours.
A more ornate chest called a kara bitsu also existed, but it was primarily used for older, more expensive armours belonging to the more aristocratic and wealthy samurai. Smaller versions were also used to store (and display) particularly fine kabuto. Temping as it is to go into its construction, I must give its construction a pass. A typical one is, however, illustrated at left.
To make the gusoku bitsu, you will need 1/4" plywood, some rope, and several fastenings you will have to construct of brass or some other metal, and a few feet of rope. The only tools you will need are a hammer a jigsaw, and a drill.
The sides of the gusoku bitsu are actually two layers of plywood. Since the lid fits flush over the edges, you need an internal lip. This is formed by the layering process. The base and lid are formed from single layers of plywood.
Start by cutting out your side pieces and checking them for size and fit. The outer side panels measure 17 3/4" tall by 17 1/4" wide. The inner side panels measure 20 3/4" tall by 16 3/4" wide.
Take each outer side and inner side piece and glue them together with the sturdiest marine-grade wood glue you can find, butting the bottoms flat.The outer side overlaps the inner by 14" on each side, and the inner side has a lip extending 3".
While the glue is drying, cut the four panels for the lid. They are 17 1/2" by 3 3/4". Also cut the top and bottom panels. These are both squares 17 1/2" to the side.
Glue the lid’s side panels together and to the top panel, using the top panel to square-up the lid. If you have clamps that can maintain the square, clamp it and let it dry.
Do the same with the body of the chest. Turn it upside down (lip down) as you glue, so that you can put the bottom panel in place. Square the sides up, clamp it, and let it dry.
When dry, try the lid on for fit. You may have to file or sand down the lip a bit to make the fit easier.
Choose which side you want to be the front of the chest. This done, on the left and right side panels, measure down 5" from the top of the lip and make a horizontal line. Now measure in 6 1/4" from either edge on this line. Drill a 1/2" hole completely through the sides at these two points. These holes will take the rope handles that will enable you to carry the chest.
Now, using small finishing nails, secure the base firmly to the body. You can also put a few small nails in the edges (and set them!) if you don’t trust glue. Don’t put any nails within 3" of any corner.
The last step before you lacquer the box is to fill all the pits, nail heads, or imperfections in the plywood with wood putty. When it’s dry, sand it nice and smooth.
Lacquer your chest. Black is the most common color.

You will now have to put on your metal fittings. These help hold everything together. You can probably find similar pieces in any furniture store, but you can also make them from metal (though you might have to do some welding for the corner pieces.
You will need eight corner pieces, and eight straps. Cut them from 16-gauge brass. Bend the straps to a 90° angle for the edges. The corners need compound folds as illustrated. You will need to weld the loose edges.
Nail the corners on each corner of the box, top and bottom, with 12 tacks. The edges get four tacks each (two per face). The edges go on the bottom part of the lid, and the top part of the box where it meets the lid (as shown in the illustration).
Knot your rope and pass it through one hole in the side, then back through the other hole and knot it inside. Repeat this for the other side. This will enable you to carry the chest. The rope should be long enough to stick up over the lid of the chest.
If you want to be really fancy, you can make metal brackets instead of using rope handles.
The chest is carried either by grasping the ropes or by passing a pole through them and carrying it over your shoulder.
The finishing detail is to paint your mon (in gold, why not?) on the front of the chest. In a classically understated way that I am sure says something about Japanese society, some chests just have an ornate cursive-painted character “mae” (“front”) as the decorative element.
Packing Your Armour
Believe it or not, there is an “official” way to pack your armour into the gusoku bitsu.
The correct way—assuming you have a clamshell armour with a removable side hinge—is to first remove the hinge.
You then place the breast plate inside the back plate.
If your amour doesn’t separate, open it and lay the parts in it as described below. When finished, fold the kusazuri over the contents, close the dō, and fold the rest of the kusazuri down.
Into this cavity, place the kote, which you folded in half at the elbow.
Then take your haidate, fold them in half left over right (plates out), and again in half so the fabric upper is on one side, the plates on the other. The fabric section goes against the kote.
Then place in your suneate, flat, one on top of the other, fabric side against the haidate.
All this means is fabric on plate, so you don’t have two pieces of plate rubbing against each other.
The last step is to fold all the kusazuri up into the body of the dō to hold everything in place. Stand the armour in the chest.
Place your face armour nose-first into the lining of the kabuto bowl, and then put the kabuto on top of the dō, resting on the watagami. If you have enough room, you can alternatively slide the kabuto between the cavity of the dō and the wall of the chest, with the shikoro on the wall side. Any armour robes can be put on top, and the lid dropped into place.