

Chapter Seven:
Making a Dō
The first step is, of course, to decide what kind of dō you want to build. I will provide instructions for an okegawa dō, and a yukinoshita dō, as well as basic information for making a hotoke dō. With this information, you can make any number of dō variants. In addition, I’m also providing information on making a “quick ’n’ dirty” version of an okegawa dō, one which we made in some numbers in Trimaris due to the ease of construction. With this unconventional and inauthentic—yet visually tolerable—method, you should be able to make an entire dō in one afternoon.
Rather than repeat instructions over and over, I have broken the construction details down by “parts” in this chapter, so regardless of what you are making there is information on the construction details somewhere in this chapter; it is just that all the information on making a complete okegawa dō isn’t under that heading; you will have to look under kanagu mawari, kusazuri, etc., as well.
Before planning or beginning any project, I strongly recommend you read this whole chapter two or three times to make sure you have and understand all the information you and instructions you will need.
Materials
To my mind, the only suitable material for heavy combat armour—unless you’re doing something with scale—is metal. It’s what they used, and it’s not really been improved upon. I have actually always preferred using galvanized steel for dō. Since there is no padding, only an optional fabric or leather liner is between your sweaty self and the metal. I don’t like taking chances. For the lames and various small plates in most dō, combat or not, 18 gauge is practical. For armour of larger plates, 16 gauge would be better. If you plan to fight in the armour and have a lot of dishing to do in the torso (say, with a hotoke dō), 14 gauge wouldn’t be a bad idea for at least the breast plate.
I’m contemplating conducting some experiments with plastic, but for the nonce I don’t believe in it as a source material for most Japanese armour. If, however, you feel for whatever reason that you must use plastic, I beg you to at least make an attempt to make the thing look like real armour rather than just a cut-down barrel. Ideally, then, if you’re using plastic, you’ll use plastic sheeting cut to the appropriate patterns, or at the very least cut whatever barrel you’re using to the appropriate forms. I’d suggest you get a hold of my article in Tournaments Illuminated on the subject of plastic armour. Please, if you must use a barrel, try to at least use real armour patterns, and don't leave any embossed lettering showing on the armour like some I’ve seen.
In general, my considered opinion is that plastic used as plate material is an abomination unto kami and man. Do it not, lest the deities of Japanese armouring cause you to smash your thumb with a ball-peen hammer. Repeatedly.
If you’re making a dress armour of scale or pseudo-scale, then using materials as described in the chapter “The Kozane” is acceptable. You just can’t use heavier leather or cuirbuilli techniques; such leather is too thick and it completely spoils the image and proportions of the armour.
Measurements
The patterns I’ve provided are taken from actual dō, and will fit a person from 5' 6"-6' tall, with a waist of 32"-38". If you need a wider dō, you must increase the measurement preferably by adding an even amount at the center-front, center-rear, and at either side.
To make the dō fit someone taller, increase the width of the lames evenly. Remember that there should be a 1/2" overlap in the lames. If the dō is not lamellar in construction, merely lengthen the patterns to suit your size needs.
Do not forget that 1/2" overlap in all the plates in the lamellar dō patterns—this is to allow grounding for lacing or rivets.
Measurements you will need are: A. Chest circumference; B. waist circumference (waist being “the level of your navel”); C. top-of-hip circumference; D. buttock circumference (the widest point); E. nipple-to-nipple measurement; F. across your shoulder blades to the end of your torso; G. armpit to waist; H. navel to base of your throat. These correspond to the measurements marked on some patterns.
The Okegawa/Yokohagi Dō
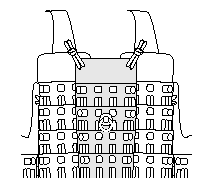
Given the relative similarities in their structure, this pattern will enable you to produce a horizontally rivetted okegawa dō, a five-sectional okegawa dō, an okegawa haramaki dō (of five or three sections), or any variation on those using lace instead of rivets. Yokohagi is the technical term for any such cuirass with horizontal plates, while tatehagi is the name for those with vertical plates. The photographs herein depict two conventional yokohagi ni-mai dō (horizontally rivetted clamshell cuirasses)—the upper one being the “older” model, the lower one being the “modern”—and a yokohagi go-mai dō (horizontally rivetted five-panel cuirass). Note that the bottom-most example, the go-mai dō, is hinged in four places.

As I mentioned in the previous chapters, there are two patterns for the okegawa dō; one with the older style four-lame nagagawa dō, and one with the newer five-lame nagagawa dō. I am providing patterns for both. Whatever style of dō you are making—scale, pseudo-scale, laced solid lame, rivetted lame, or any combination of these—all are made using these patterns. The photograph at left is a retainer-grade dō made to the old pattern (note the number and arrangement of the lames.) The photograph below it is a similar dō to the new pattern.
Not counting the 1/2" overlap, older pattern lames typically have 2" of exposed surface. The newer pattern has about 1 1/2". This, plus the overlap, is the width of your plate.

Only if you are short (say, less than 5' 4") or tall (6' or more) should you have to alter the width of the lame. The dō should sit approximately on your hips, so take a measurement from 6 1/2" below your armpit to your hip. Divide the result by 3 for the old style and 4 by the new. This gives you a target for your lame width. (Don’t worry—I know the number is one less than the lame count: the bottom-most lame is not “normal” width, so I’ve taken that into account with an excessive “armpit dip.”) For the bottom-most lame, add or subtract the same amount relative to the other lames (e.g., if your target measurement adds 3/8" to each lame, add 3/8" to the bottom lame).

Use the pattern you prefer and scale it as appropriate for your use. Mark your lames and cut them out. One variation on measurements I do is that for combat armours I use a nipple-to-nipple measurement for the width of the front tateage. This is an approximation of your violent range-of-motion comfort-zone. That is, you won’t jam your armpits if you swing your arm inward.
Mark the vertical center-lines in the front and back; these are your “keels.” Measure out from these keels every 2 1/2" and make another mark.

If you’re riveting the armour, the marks are for the rivets; if you’re doing sugake odoshi, the marks are the center-point between the pairs of holes you must make for the lacing. Since the size of the holes and the spacing between them is dependent on the lacing you use, this pattern to give you spacing for your holes. If you’re lacing the armour in kebiki, more power to you and make the bajillion sets of holes as you need them (keeping in mind the minimum horizontal spacing to allow total braid coverage of the surface).
If you are making a riveted dō, you can either grind the rivets flat or allow them to protrude (in which case they should be slightly domed). Rivets usually follow straight vertical lines, although you can stagger them if you’d like. They should be no more than 2 1/2" off-center.
Open all the holes you will need.

Curve the plates to the proper form. The front tateage will have very little curvature, while the tateage on the back will also be generally flat, but with a gentle up-down-up cross-section. The belly plates will be more seriously curved, and the back plates will have a more pronounced M-curve (note the photo at left of the back of a dō and you will understand how this should look). Warp outward—making a sort of lip—the bottom 1/2" of the bottom-most lames .
Put the armour together from the top down, riveting or lacing as necessary. Remember that the lames overlap upward, so that the top edge of plate #2 overlays the bottom edge of plate #1.

If you will be riveting your wakiita (arm-pit plates) in place, leave the outer-most rivet holes in the tateage empty until you are ready to place them.

Only then should you rivet the plates together and to the wakiita. If you are lacing the wakiita in place (e.g., making a laced dō), make sure you have an extra hole at the edge of the first lame in the tateage to take the cord.
Make sure the left side of the dō (that is, the left side as it is worn) is straight so you can place the hinge and open it without any problems. Cut or grind off any jaggedness. Using a strip of duct tape as a temporary hinge, try the dō on. Remember that the back should overlap the front on your right side.

If the fit is good, grap some tin snips and cut a piano hinge to the appropriate length. Piano hinges are long, flat hinges that can be found at any hardware store. You should cut the hinge just long enough to enough to allow a 1/4" gap between the bottom of the dō and the top (without the wakiita)—typically this is around 7"-8".

You can either rivet the hinge in place (typical with retainer-type armours) or lace it in place. More fancy suits, as shown at left, were made with tiny vertical pairs of holes at the edge of each lame, through which and with matching holes all along the hinge, narrow cord “staples” tied the hinge in place. For SCA combat, rivets are, of course, your best bet.
If you want the hinge to be separable, remove the hinge’s wire pin. It may take some work, but it can be done. Use pliers and tug, pull, and work the hinge back and forth. Once you’ve got it out, take a piece of wire with a diameter slightly narrower than the aperture and cut it to the hinge-length plus 3/4". Make a small loop out of that excess, and insert the pin. This loop is your handle is so you can pull the pin and separate the breastplate from the back. It makes for easier packing that way—the breastplate fits into the backplate.
If the kanagu mawari are being finished in a different manner or are being laced into place, apply your finish to the dō now. You can finish it in whatever method you prefer—powdercoating, painting, or what have you. If the kanagu mawari are to be finished en suite with the dō, apply them first and then finish the dō.
Attach the munaita according to your prefered method (rivets, suspended lace, or cross-laces). This is also how you will be doing the wakiita and oshitsuke-no-ita. Note that the oshitsuke-no-ita will already have the watagamiattached at this point.
It is time to attach the kusazuri, any metal fittings (hassō byō, heraldic appliqués, sashimono fittings, etc.), and cords and frogs.
To fasten the dō, you’ll need a 10" and an 18" length of cord. These make up the takahimo, the closing ties. Knot the short cord into a small loop and pass the ends through the pair of holes on the back plate’s open side, and knot it on the inside. Pass the longer cord out through the holes on the breast plate’s open side. Pull it so that one end is about twice the length as the other end, and tie off a knot near the dō. This leaves you with uneven lengths.
To fasten the dō, you will pull the longer end through the loop and then forward, and tie to the shorter length in a bow knot.

If you are making a ryō-awase dō, which fastens with ties on both sides and has no hinge, you are in for an easier construction. See the photo at left for a typical ryō-awase dō.
Once all this is done, you should line the dō. Cut some supple, black leather or black cloth to match the body (less the kanagu mawari) front and back, and glue the lining panels in place.
If you’re putting a lined section in the top of the dō to pad the watagami and give you a protective standing collar, this is totally optional. The standing collar and winglets are brigandined (kikkō), while the part under the armour itself is simply padded. The fabric sections are done in the same manner as described in the chapter “Before Beginning.” The only difference is that they have the addition of 1/2" of batting between the canvas inner layer and the lining fabric.
This lining is attached to the watagami by pairs of small holes you must open along the edge of the watagami and along the upper inside edge of the oshitsuke-no-ita. These holes are for the “lace staples” with which you should be familiar by now.
If you plan to wear a manchira (see the chapter “Miscellaneous Armour”) the lining section is totally unnecessary, and even a nuisance.
A Dō With Laced Lames

Note that, contrary to common misconception, laced Japanese armour—at least in modern styles—does not move, and the lames are not flexible. The armour is held rigid by way of special pieces of lacing called “tomegawa” (lit. “stopping leathers”). If the dō you are making is laced, whether only for one lame or in entirety, you must open special holes in your plates in addition to those for the odoshi itself for these tomegawa. Tomegawaare short lengths of fine cord (I recommend artificial sinew) that pass through these holes and the upper-most row of lacing holes. This is what makes laced armours rigid. For sugake odoshi, there is one set of holes per row of lacing; for kebiki, it is one set of holes every 3" or so.
The photo shows an armour laced in sugake odoshi that is becoming threadbare, and the tomegawa are visible where the lacing should be.

The illustration at left shows the proper method of doing this. If you are going to fight in this armour, you might feel that the laced method of solidifying the dō isn’t going to stand up to the beating—and you may be right. An option instead is to put a rivet through the two plates via a hole between the upper lacing holes. This rivet will, of course, be hidden under the cross-lacing. You will have to draw the kedate through the top two holes first, then insert the rivet and pien it, and finish by inserting the lacing through the second row of holes, hiding the rivet.

It may go without saying, but if you are lacing your armour together, you will have to do all the finishing details—lacquering, etc.—before starting your lacing. The link at right will provide you with measurements as to the proper spacing of your holes depending on the width of the lacing you’re using.
Other than lacing, the construction details are virtually identical to the rivetted dō. One difference is that dō of laced construction frequently have a small section of armour lacing at either end of the tateage (both fore and aft) to help hold them up.
Pattern Conversion: Haramaki Dō
Alteration: To make a haramaki dō out of any given pattern, start by taking the posterboard pattern and finding the center-point of the back plates, and drawing a vertical line 1" to either side of it. Cut the pattern on your scribed lines, and tape the “inside” edges to the edges of the front lames. This gives you a single, long, curving plate for each lame (but be sure to ignore the extension for overlapping the front plate when you line them up!). This will also produce a 2"-wide gap up the middle of your back. You can cut a wider gap to cut down on weight if you plan on making a “coward’s plate” to cover the back.
Attach the lame patterns together with a few strips of duct tape and hold them closed on your body. Using a Sharpie, mark the lines for hinges (whether two, one at either side; or four, at the “corners”). You will need two hinges to make the sakura dō and four hinges to make a go-mai haramaki dō. Cut the patterns to fit these marks. Make sure to clearly number and identify the various lame-bits (e.,g., number the lames 1, 2, 3, and their segments as 4a, 4b, 4c, etc.), as it could get confusing very quickly.
Mark, cut, and punch the lames. Lable them. Keep your pieces organized!
From this point, the armour is constructed more or less as normal, with the caveat that you will be putting in four hinges (or two) instead of the standard one on the left side.
When you are ready to attach the oshitsuke-no-ita, you must cut two of these plates instead of a single one. The width of the oshitsuke-no-ita corresponds, of course, to the width of the top of the rear tateage. The watagami is attached to them in the normal manner.
Put a single set of kohaze at the inner edges of the oshitsuke-no-ita plates, facing in to the spine. When fastened, these hold the back closed. If you are planning on making a coward’s plate (see below), you may put a second set of kohaze at the bottom, at the small of the back.
If you aren’t planning on a coward’s plate, attach a length of cord at the bottom edge of each of the back plates just below the suspensory lacing for the kusazuri. These cords should be of sufficient to wrap around your torso and tie the armour closed in front.
Making a Coward’s Plate: This is a slender section of armour identical in style to the rest of the dō, which is worn on the center back to protect the back from attack. It derives its somewhat derisive name as only a coward was deemed to need one. Technically, it was also called a “se-ita,” or “back-plate.“
The width of the se-ita mirrors any given section of the back; if each plate of the oshitsuke-no-ita is 5" wide, so is the oshitsuke-no-ita of the coward’s plate. If the dō is of rivetted lames, so is the coward’s plate; if the dō is of scale construction, ditto. Pendant from the coward’s plate is a single set of kusazuri.
At either corner of the coward’s plate’s oshitsuke-no-ita, attach a kohaze. These frogs meet their mates at the base of the watagami, to which they attach to hold the coward’s plate in place.
On the center of the second lame, or the third if you are using the higher lame-count pattern, attach an agamaki-no-kan (as described in the chapter “Before Beginning”).
At either side of the base of the se-ita (just below the suspensory lacing for the kusazuri) attach a length of cord sufficient to wrap around your torso and tie the armour closed in front.
Pattern Conversion: Go-mai Dō

When you make a go-mai (five-plate) dō, you must slightly modify the pattern. Start by taping the left sides of the back lame patterns to their corresponding front lames’ left sides. As the go-mai dō is essentially just a modified clamshell with four hinges instead of one, what this does is eliminate that one hinge and allow you to mark the others. Mark and make the modified pattern (scribing the hinge points) as mentioned in the above section, “Making a Haramaki Dō.“
Other than the number and placement of hinges, the construction is virtually identical to the conventional dō. The one critical difference is that the wakiita can not perforce be rivetted to the tateage, or the hinges wouldn’t move. With a go-mai dō, the wakiita are secured to the tateage with a small bit of cord, as previously described for laced armours.
One thing of critical importance which you remember is this: whether there is one hinge or four, as seen from above, the dō forms a gentle curve throughout. There should be no “corners” or “edges” at the location of the hinges. The dō is a circle, not a square.
The Sendai Dō
This is a five-sectional armour of solid-plate construction. It is unusual in that this is the one form of cuirass that doesn’t have much interchangeability with other styles. That is, the style of watagami with this armour, with its attached solid kohire and elongated and hinged gyōyō, is unique to the sendai /yukinoshita dō, as are the kusazuri with as many as eleven sets. Yukinoshita dō are also extremely simple armours, and not dressed up with printed leather or other fancy variations.

The pattern provided is for our proverbial “typical Japanese fellow.” To modify the patterns provided to fit your personalized measurements, take your chest measurement (add 2"), your hip measurement (add 1"), and your armpit-to-hip measurement (subtract 5"). Divide these measurements proportionally according to the pattern (i.e., the bottom widths of the side plates and front plate are about the same, the back plate is about 20 percent wider; and the measurements at the chest level are different). The illustration at left shows the layout of the plates in the pattern.
Using tape in place of rivetted hinges to hold the torso pattern together, make sure of the fit. Use a strip of tape to secure the dō closed under your right arm. Move around a bit. Make sure you have a range of motion satisfactory to your fighting style. When you’re satisfied of the pattern, transfer it to 18-gauge steel (16 gauge or even perhaps 14 if you plan to fight in it) and cut out the plates. You may need to have some help to make certain that the watagami and kohire are in the right place, so that when you remove the cut-outs for the hinges they are in the right places.

Curve the side plates and the kanagu mawari.
Unless you’re making the dō for someone very thin, the front plate gets a slight dishing to accommodate the belly. This is a very gentle dishing, ideally no more than an inch deep. The left and right edges must be flat, however, to accommodate the hinges.
The back plate gets its compound curve, giving it the impression of a cursive m. This curve is reproduced faintly in the oshitsuke-no-ita.
Attach all the kanagu mawari before putting on your hinges.
Curve the watagami and dish the kohire. Make sure that they fit well before you rivet the hinges. The hinges go under the plates, with the rib of the hinge taking up the space between the cut-outs.

Curve the gyōyō to follow the line of the watagami and rivet its hinge in place at the fore-end. With this type of armour, the frog emerges under the watagami (actually the gyōyō) rather than over it.
Rivet the hinges to attach the watagami to the oshitsuke-no-ita.
The body hinges on most yukinoshita dō are on the outside of the armour, rather than the inside as is usual. Take your piano hinges and cut four lengths that allow 1/4" above and below the hinge on the torso plates. Rivet the hinges in place, grind the heads flat, and try it on for a rough fitting.
Finish/paint the armour. Be careful doing the hinges; be sure to work them a few times as the lacquer is drying to make sure they don’t seize up on you. In fact, I’ve known armourers to finish the armour and the hinges before applying them, and then carefully filing the rivets flat and applying paint or lacquer to only the affected parts.
Now is the time to install all the cording and ties. If you are putting in a frog at the center-front bottom to hold up the haidate, install it now as well. This is also the time to attach any fittings for a sashimono.
The last step is the application of any kanamono (brass or copper gilt fittings) that you may want to put on the armour. This includes any hassō byō and hassō kanamono and grommets.
Now you move on to the kusazuri, detailed below. Remember that you will need at least nine, and more likely eleven sets. Once they are finished and laced into place, you may line the dō. Cut out thin leather or black fabric to cover the inside of each of the torso plates and glue them in place. The lining should be in five separate pieces, as are the torso plates. Remember that the lining doesn’t cover the kanagu mawari except for any edges attached to the torso plates.
The Hotoke Dō

This is a clamshell armour of two solid plates. The pattern is provided, and the construction details should be fairly clear from what I have written before. There is a lot of dishing to be done with this dō, obviously.
A common variation is the hatomune dō, a smooth cuirass with a vertical ridge down the center front, which was inspired by European armours. This is also the pattern which you would use to make a niō-dō or any other form of embossed armour.

Details on design and construction of items for this armour such as the kusazuri, the watagami, etc., are identical with those from the okegawa dō, so refer to the patterns and instructions above for their construction.
No patterned leather should be used; this is a simply lacquered dō that may be painted with a heraldic crest, or even embossed with images from Japanese mythology. I’m not even going to suggest how to do that; I’m just giving you the pattern. Have fun.
Alternately, you can make the kanagu mawari (the munaita, oshitsuke-no-ita, and wakiita) as separate plates; this was fairly commonly done and is one way to make the hotoke dō a bit less “common.” The pattern I’ve provided is for the simplest version and is virtually identical with the photo above.
The Kusazuri
Pattern and Measure
As modern armours were more shaped to the body, they had a larger circumference at the armpit level than at the waist. The classic pattern mirrors the dō measurements with the kusazuri. That is, the total measurement of the top-most lames of the kusazuri is equal to the waist measurement of the dō, and the total measurement of the bottom of the bottom-most lames should equal the circumference of the top of the nagagawa dō.
Also, if the dō is the older model, there would be four lames in each kusazuri set; if the newer pattern, there would be five. This pattern was not always followed, but it was considered the ideal.
Kusazuri were hardly ever cut as straight rectangles. They are trapezoids. When you lay out your pattern, remember that there will be a 1/2" overlap from plate to plate, so take that into account when measuring and cutting. Otherwise, you will have kusazuri that have a jagged-edged appearance. Of course, if your kusazuri are of hon kozane or kiritsuke zane (i.e., scale or pseudo-scale construction), then they actually are rectangles.
There is no reason you can’t actually increase the widths by a fraction of an inch beyond the “ideal measurement” to maintain a nice, clean overlap—I do.
Decide how many sets of lames you want (six, or usually seven, being the most common number), and divide the dō waist by that number to arrive at the width of the top plate of your kusazuri. For some armours, you may have to fudge measurements slightly. In other words, if you are making a clamshell armour that you plan to be able to disassemble (i.e., remove the hinge pin and make a separate breast and back for storage), you must make a separate measure for the back (four panels) and the front (three panels). This may, of course, make the front panels slightly wider than those in the back; there is nothing wrong with this. If you are making a yukinoshita dō and have a waist of 45” or more, you might want to consider making 13 sets of kusazuri instead of 11.
The lames should be of the same stock as the dō, so if your dō is made of 2 1/2" lames, so should be your kusazuri—although there is nothing wrong with making them a smidge narrower (but if you do so, you must remember to make the sode narrower to remain en suite).
The lame count is, as you may have guessed, usually based on the number of lames in the nagagawa dō. This is not written in stone, however. A retainer armour or typical okashi dō may have only three (often slightly broader than normal) lames, for example. Generally, you’re safer with four or five, depending on the nagagawa dō.
Suspension Lacing:

The suspensory lacing—the yurugi ito—is traditionally kebiki, even when the rest of the armour is laced with sugake odoshi. Only the cheapest or most deliberately understated armours laced the yurugi ito in sugake odoshi. While the yurugi ito in old armours was no longer than the measure of the kedate (the lacing between ordinary lames), in modern armours the measurement is greater. Yurugi ito typically measures a full 4" from the lacing hole in the dō to the top of the kusazuri lame.
Belted Kusazuri:

While the lacing is traditionally directly from the dō to the kusazuri, a feature on later armours had the lacing going into a sort of belt that itself is tied to the dō at several places. This makes for removable kusazuri. It is an admirable alternative when you are making an armour that you want to be able to break down for packing.
The belt is about 1" wide, and long enough to reach from one end of the armour around to the other end. If you are using this method of attachment, you can make your kusazuri sets all the same size, ignoring the problems of different plate widths. More often than not, the belt was a natural dark tan, although there is no reason you couldn’t dye it black or red to match your armour.
The belt is held on by simple bow knots every 4" or so, with the knotting cord emerging from the dō at the waist. This will all be covered when you tie on your waist sash, anyway.
Alternatives:

If you don’t want to use lacing for suspension, you can use leather or mail-fronted padded fabric panels. Cut your panel 5" long. The bottom width is the width of the top lame of the kusazuri. For the top measurement, you must divide the waist by the number of lame sets and use the resultant number. (For example, if your dō waist is 38 1/2" and you plan for seven sets of lames, the top must be 5 1/2" in width.)
The top-most 1/2" is folded under as you stitch the panel to the dō. The bottom simply disappears under back of the top-most kusazuri lame and is stitched down by a row of cross-laces or nawame odoshi.
If you are using fabric, make it the same as with other fabric parts described herein (i.e., of three layers) with the edges overlaid with black bias tape.
Decoration
You should pattern and decorate your kusazuri after the other dangly bits. This means, of course, that they need not follow exactly the same pattern and style of the dō.
The Kanagu Mawari
For a dō, the kanagu mawari consists of the munaita, wakiita, oshitsuke-no-ita, and watagami.
Forming the Plates

Cut the munaita and oshitsuke-no-ita to the pattern provided, albeit to the width of the top of the tateage. The width of the wakiita is also dependent on the span you need for the armpit clearance. There are several different ways to attach the kanagu mawari to the dō; click the small illustration at left and a PDF will pop up showing details that will offer more options to customize the armour you’re making.

If you are attaching these plates to a dō of hon kozane or kiritsuke kozane construction or plan to use a row of cross-laces to secure them, lay the top-most lame along the proper plate and mark all the holes from the top-most line of lacing. The extend flaps at either end and the middle are to give the hassō byō a seat through the first plate and the kanagu mawari plate. Mark the holes here, too, for both first and second rows. These holes will receive the lacing.
If you are riveting the kanagu mawari to the dō, cut the bottom as a straight line instead, as you will need rivet seats for the entire length of the plate. This difference in cut can be observed in the pattern for the munaita, in which I give you three different styles for a munaita top, and the two different bottom lines.
If you wish to use suspensory lace to hold the kanagu mawari to the dō—an uncommon but viable option—punch a line of holes for kebiki or sugake, as you choose, with distances appropriate to the width of the lacing you are using. This line should allow suspensory lacing as long as the rest of the armour’s kedate (if there is any). This may not be possible with the munaita; you may either make that lacing shorter or extend the height of the munaita.

Regardless of what you plan to do to finish your kanagu mawari, a common feature you may wish to consider is to warp out the top 1/4"-1/2" of the wakiita to prevent pinching. Sometimes the same warp is given the munaita; but the oshitsuke-no-ita is never anything but flat.
The most difficult piece to get right is the watagami, as the pattern is really dependent on your measurements. Remember to use 14- or 12-gauge metal for this one section if you are going to be using it in heavy combat. The metal takes a bit of strain, and I like to make them sturdy.

The pattern here is one for a typical dō; you may have to alter it. For length, consider that the gap between the end of the watagami and the top of the munaita should be 3"-4". For its actual width, you shouldn’t have to change much. Consider as a rule of thumb that the base of each watagami is about one-quarter the width of the oshitsuke-no-ita.

The markings on the side of the watagami are for the frogs to secure the sode and/or kote. Given that you will have to customize these patterns somewhat, I recommend that you make a posterboard mockup of the watagami and oshitsuke-no-ita, taping them to the dō, and have a friend help you mark them in the proper place. If the top of your shoulder is at point A, each frog should be about 2 1/2" to the front and 2 1/2" to the rear of that point.
You have an option on the watagami to put a single pair of frogs for your kote (if you plan to eschew sode), or two pairs (for kote and sode). If your kote are the tie-on variety, you need only one pair for sode. You can still fasten both on with a single pair, however, which is a method I personally prefer. This method is described in the chapter “Putting It All On.”

If your watagami have attached plate or lamellar kohire, your frogs will emerge from under the watagami instead of over it. This is because you can’t fasten your kote over the winglets.
Finishing the Plates
As described in the previous chapter, your kanagu mawari can be finished in one of several ways. If you opt for printed leather panels, these panels are made according to the methods described in the chapter “Before Beginning.” They extend to the ends of the plates, with the koberi (the edging leather) at the edges. These edges are always overlaid with fukurin to help hold the leather in place.
If you are decorating the kanagu mawari in any way other than lacquering it in the same color and making it contiguous to the dō, you must completely finish it before doing anything else. This includes any patterned leather or fukurin.
The finished plate is attached to the finished plate. In other words, the finished watagami is attached to the finished oshitsuke-no-ita, and this combined piece is attached to the finished dō.
Fittings for a Sashimono
You will need experience with hot-working metal to make part of the sashimono fittings. Use 3/8" bar stock (rounded or square) for this.

Start by making the central frame with an internal dimension of either a 1 1/2" square or a 3/4" circle. It is square as some sashimono banners actually sit in long, boxlike sheaths that are themselves attached to the armour. If you only are using a banner pole, make the receptor round instead of square.
Next, make two arms. If you are using square stock, round off the extreme 1/2" of each arm to about 3/8" so that it can rotate in the housing. If you’re using round stock, reduce the diameter slightly at the extreme 1/2".

Weld the arms to the central frame and file or grind smooth any bumps or excess weld. You have now completed the piece called the “kattari.”
Place the finished kattari (bracket) against the oshitsuke-no-ita. (It is easier to do this before attaching the oshitsuke-no-ita to the dō.) Make sure that the middle is on the centerline and the edges are about two-thirds down from the top. Trace around the edges with a Sharpie. This mark is where you will place the fasteners. For the fasteners, you can either use a pair of cotter pins or make a pair out of extra barstock. They really are just large cotter pins, though.
Something you might want to do is slip the cotter pins onto the bracket and then make a “head” (like on a rivet or nail) on the ends of the arms so that the bracket won’t slide in either direction on the pins. Then you will fasten the pins to the dō.
Secure the fasteners, then finish the oshitsuke-no-ita as you normally would. Your final step when all is done is to lacquer the kattari and spring it into place in the fasteners.
If you want to make a simple, quick, and obviously cheap one, cut the pattern shown out of 1/4" – 3/8" plywood (excess from making your armour chest?) and lacquer it black. This is attached to the dō by a pair of cords at each end that go through a pair of holes in the oshitsuke-no-ita and tie inside. This is suitable for inexpensive, retainer-type armours.

To make the base receptical, the machiuke, trace the “cup” pattern onto a piece of 18-gauge metal, and the “back” onto a piece of 14- or 12-gauge metal, and cut them out. Punch all the holes.

Roll over the top of the cup as marked to soften the edge and fold it in as shown in the illustration. Don’t rivet anything yet.
Curve and smooth the bottom of the back piece and place it behind the cup. Insert two rivets, heads inside the cup. Pien the rivets over. Your uketsubo is done.
Place it on the middle of the dō’s lower back so that the bottom of the cup is level with the holes for the kusazuri suspensory lace. Mark the holes with a Sharpie, drill them out, and fasten the machiuke in place with a short length of cord knotted inside.
Making a Maekake Dō (Haraate)

If you are making a maekake dō. or haraate, follow the general information provided above (eliminating any back plates and hinges, of course). Mark the edges, as there is no extra length on the right side for an overlap, either. At both extreme edges of the bottom-most plate, punch holes for the waist ties. Finish it as usual. The llustration at left is of a more expensive type of maekake dō, a three-sectional mōgami haramaki.
The watagami for a maekake dō are soft. I recommend heavy belt-weight leather, 1"-1 1/2" in width. For the sake of aesthetics, you can decorate it to resemble patterned leather or you can just dye it black or red (all are acceptable alternatives).
Cut two straps long enough to reach from the corner of the wakiita across your back and over the other shoulder. The strap should end about an inch away from the top of the munaita. Round the corners on one end, and cut the other end in a semicircle. The semicircular end, of course, is the front. Punch two holes near the end for the kohaze and four holes (two pairs of two) at the other end for a cross-lace fastening into the wakiita.

Install the kohaze.
Punch the two wakiita to correspond to the cross-lace holes in the straps, and secure the straps in place with lengths of lacing. If you plan to wear kote and/or sode with this dō, put it on and get someone to help you mark the location of the holes on your watagami for the requisite kohaze. Install the kohaze as you would for a solid plate watagami.
The last thing you need to do is cut two lengths of cord for the waist ties. Secure the cords. The length should allow you to pull the cords around the back and to the front where you tie them down. If you prefer, you can cut them extra-long to allow you to tie it closed in the back.