

Chapter Nine:
Making a Kabuto
This chapter covers the construction of two common types of helmet bowl and two common forms of shikoro. In the primary instructions I will tell you how to make authentic, dress kabuto. At the end of the chapter are details on how to make combat-quality kabuto using these directions.
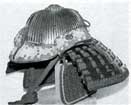
Multi-plate Bowls
Japanese armourers working on multi-plate kabuto invariably use a kata, or “form,” in the construction of multi-plate hachi. With a great number of plates calling for a precise alignment and meeting of edges, doing so “freehand” is obviously difficult. Old-fashioned, hemispherical helmets are easier to make freehand. There are several helmet bowl shapes, however, and the armourer would require a different kata for each. Perhaps for this reason, armourers were well known for a particular style of helmet. One who made excellent akoda-nari (a type of helmet most recognizable for the hump in the back) might never make a low-sided, flat-topped bowl more common to other smiths. In the SCA, we aren’t likely to be allowed the luxury to be so limited in our repertoire. Helmets with hemispherical profiles are easy to cut and dish; all the plates are the same shape. For the other helmets, however, plates have to be cut at different bends and angles to allow for the more oval shape and flatter profile.
To build your “helmet last,” cut the layered pieces from a 1 x 12 (the harder the wood the better), glue and tightly clamp them together, then file or sand the edges smooth. For those familiar with making ship models, the parallel to making stacked-board ship hulls should be obvious. The kata should be taller than you need it to be. This is to allow the construction of both short- and high-sided bowls. With a kata, you can make helmets from as few as six or eight plates up to 120. There is no set plate count for the kata; what matters is that when you dish or raise your plates, they must fit on the kata in the proper place.
Creating Your Own Patterns
I’m going to describe a method of creating your own multi-plate helmet patterns using a kata. This is essentially the method that was taught to me in Japan.
To make a hachi with more plates, the first thing you have to do is decide on the number of plates. Let us assume we will be making a 32-plate hachi. Cover the kata with masking tape. Do not stretch the tape; apply straight, short strips about eight or ten inches long all over the kata until there are about three layers of tape over the whole surface.

Scribe a circle to mark the tehen at the center of the crown of the bowl. Decide if the front plate is to be wider than the others (as some were). If not, divide the circumference of the circle by the number of plates (in this case, 32). Using a protractor or other device, mark at the edges of the tehen the ends of the plates. Remember: there is no “keel”—there are plates at center front and back, not joints between plates, so be careful you don’t place a line there.
Decide how deep you want the bowl to be. Tape a Sharpie to a ruler so that you can scribe a line around the kata at the level you want for the bowl’s depth. Since the helmet actually has a sloping section removed from the front, at the center front, mark a point about one inch higher than the scribed line. Mark a point at the center of each left and right sides at the scribed line. Draw a smooth curve from the left-side point on the scribed line to the higher mark at the center front and back down to the mark on the right side. This is the bottom of your helmet bowl.
The next step is to measure the circumference of the base of the hachi and divide that number by the number of plates. Mark the edge position on the bottom. Now all you have to do is connect the lines, bottom to top. Try to make the lines as vertical and straight as possible. Take a look at any multi-plate helmet and you will see what I mean. The lines should not stray. You might want to take circumference measurements halfway up and again a little higher up and make more sets of marks just to be sure the lines are plumb.
Before you do anything else, number the plates. The center front and center back plate do not get numbers; they are CF and CB. The numbers begin with the first plate forward of center back, increasing as you round the helmet toward the front. Why are they numbered in that order? Because that is the order in which they are attached. In making a hachi, the plates are riveted from the back to the front. Note that you only have to number, mark and cut one side, as the other is a mirror image of the first. Makes it easier, no? For the record, use the left side. If you always use the same side, you’ll never have to wonder whether the marked 3 is left or right: if it’s marked with a 3, it’s the left side, and the blank reverse is the right side.
Mark vertical pairs of dots at four points on the helmet for the shiten-no-byō and the hibiki-no-ana. If the center-front of the helmet is “north” these points are as close to “northeast,” “northwest,” “southwest,” and “southeast” as you can make them. (In a 32-plater, this would be L4, R4, L12, and R12.) Also mark a dot at the center of the rear-most plate. This is for the kasajirushi-no-kan.
Take a sharp X-Acto or hobby knife and cut precisely along the lines you’ve scribed. Carefully peel off the tape and reapply each strip to a sheet of posterboard lining them up in their proper order. Leave plenty of space between them for the next step. You now have two symmetrical strips, one at either end, marked CF and CB. With the pieces laid flat, you can see how they warp to form the proper shape.
The next thing is to outline the tape with a fine Sharpie or other permanent pen. Add to the outline about 3/8" – 1/2", tapering in toward the top, to the front side of the plate edge. That is going to be the underlap. If you intend to build a hari bachi (a bowl with flat plates and no ridges), that’s all you need to do. If you want to build a suji bachi (ribbed bowl), add another 1/8" or 3/16" to the back half of the plate as well for the turned-up rib. Make sure that when you mark these excesses—the rib and the underlap—they are marked as excesses.
Take a look at the patterns I’ve provided, and you’ll understand. If you don’t mark them as excess to the exposed plate, you could easily lose track of what is intended to be the plate’s true width. The last thing you need to note: the CF plate has no excess unless it is ribbed, in which case both sides get an extra 3/16". The CB plate has no ribs either way, and being under plates L1 and R1, has to have the underlay added to both sides beyond its marked exposed width. Again, keep track of what is supposed to be exposed versus what is exposed.
Decisons: Koboshi or Not?
If you are going to make a koboshi kabuto, be prepared for lots of work. Each plate can have 25 or more koboshi, whereas in a normally riveted helmet the number of rivets is typically six.

Koboshi are easiest to make by riveting with the head of the rivet inside the bowl and the shank on the outside. Do not pien these over; just strike them flat on the end of the shank a few times to expand their girth enough to grip the sides of the holes in the two plates. You will then have to file or grind the tip of the shank into a dome or point. Each rivet. Twenty-five times per plate. That’s 1,550 times for a 62-plate helmet. I’m planning on conducting an experiment with koboshi rivets I cast myself where the heads are the conical dome and the shaft is like a normal rivet.
If you’re making a koboshi kabuto, put one rivet hole on the bottom of the plate 3/16" from the bottom, one rivet hole at the top about 3/4" from the tip, and evenly space the remaining 23 holes. Considering that many koboshi kabuto have the rivets running up the center of the plate rather than near the edge, you will have to extend the underlap of the plate to the front so that the koboshi will go through both layers.
I wouldn’t recommend a koboshi for fighting—after all that work, one dent and you may find yourself contemplating seppuku.
Cutting and Forming Plates
If you are making a helmet for dress, you can use 18 gauge, which is approximately the thickness of Period models. If you’re doing a combat helmet, 16 gauge should be perfectly fine, as about a third to a half of the helmet is actually double layer, anyway. If the helmet’s ribbed, it has even more intrinsic strength.

Typically helmets will have six rivets per plate, so mark a line about 1/4" from the back edge of each plate (ignoring any excess for a rib), then drill or punch a hole about 38" from the bottom and one a half inch from the top, and evenly space the other four between these two.
Drill or punch only the bottom-most hole for the underlapping section. This will enable you to hold the bowl together for the time being with screws and nuts. Do not punch or drill the other underlapping plate holes just yet.
Use whatever method you prefer to cut all your plates but be careful not to lose the exacting measurements. The more plates you have, the less leeway you have with excess, and the less tolerance for margin of error. On a 62-plate helmet, a scant one-millimeter increase in each plate—the width of a line drawn by the broader model Sharpie—will result in an increase in the bowl circumference of 6.2 cm, almost two and a half inches!
You may want to switch over to the fine-point Sharpies now. In fact, toss the fat ones. It’ll save you grief in the long run.

Be careful not to overdish, as these are small plates. As you dish each plate, keep going back to the kata and placing the plate against it. The plate should fit like a glove with no gapping, and no force needed to make it lie flat against the form. Also be sure that you are testing each plate against the part of the kata to which it belongs. (To facilitate this, you might want to mark your kata, or run a line of tape along its base and mark on that the place where the plate edges are supposed to go.)

If your bowl is to be ribbed, raise the rib after dishing by laying it against the edge of the anvil and turning the outer edge up 90°. You have the choice of making an even rib or turning up a rib that is low at the crown but deeper at the base. (You need to decide this before cutting, however, or you can make it an even rise and grind the ribs closer near the top, a method I prefer, as it makes raising the ribs easier and ensures a reasonable uniformity of height.) If necessary, go back to the kata to recheck the fit, as raising the rib often knocks the fit off kilter.
Using screws and nuts, attach the bottom of the CB and the L1 and R1 plate, then keep going until you’ve attached the CF to the last side plate on both sides. Using a Sharpie, mark the position of each rivet hole on the underlapping plate below. Disassemble the plates, and drill or punch the rest of the holes.
Begin to rivet with the top-most rivet on the CB/L1 joint. The head of the rivet should be on the inside. You may want to cut the shank of the rivet short so that it shows only slightly above the surface, because after you’ve piened and expanded the rivet, you will have to grind or file the “bump” flush so that no rivet shows. Rivet the entire joint before moving to the CB/R1 joint. One important thing: do not put a rivet through the bottom-most row of holes. These holes will also hold the hachi to the koshimaki (skirtplate), and you have to wait for this.
You will need to file or grind off the rib from the bottom half inch of the hachi, so that the skirt plate can fit. If you aren’t making a ribbed helmet, scribe a line around the hachi half an inch from the edge. This will be your marker when you make the skirtplate.
Almost There!
The easiest way to get a koshimaki (skirtplate) to fit perfectly is to make it custom with each helmet. That means, no set pattern. What I do is to take the masking tape and put strip after strip after strip along the exposed bottom of the hachi(butting against the ribs or reaching the line you’ve scribed). You’ll want three or four layers over the whole area. Don’t force the tape into bends; keep the strips as straight as you can. This assures limited distortions if the tape should “pull back” into its shape. This is similar to the way you made the plate pattern on the kata.
The reason there is no set pattern for a koshimaki is that the shape of the koshimaki will vary with the diameter of the bowl, the curve of your plates, the amount of the rise you put in the front, etc.
With an X-Acto knife, trim away the excess tape that extends below the plates. Then trim the tape along the top of the koshimaki, either at the line where the ribs begin or at the line you’ve scribed to mark where the koshimaki goes. Cut the koshimaki at the exact center front and carefully peel the tape and reapply it to a sheet of posterboard. Note that it proscribes a shallow arc. Mark around that tape with a Sharpie, and add 3/8"-1/2" to the bottom as the koshimaki is longer than the exposed hachi plates. Depending on the style of helmet you are making, you might even want a deeper koshimaki. If your hachi is ribbed, you will need to add 1/8"-3/16" to the top to make the horizontal rib on the koshimaki, which butts up against the vertical ribs of the hachi; if the hachi is not ribbed, your koshimaki can lie flat on the rest of the bowl. Extend both the front edges by about 3/8" to allow for a slight overlap. When the koshimaki is attached, you will put a rivet through this joint at the bottom, and then grind it flat.
Cut the koshimaki from the same metal stock as the hachi. Punch the holes for attaching the lining along the edge. These are groups of two tiny holes, about 1/32" in diameter and 3/8" apart, spaced about the rim at 1 1/2"-2" intervals. There are also holes for the attachment of the shikoro. Use the pattern for koshimaki holes supplied herein. You will probably want to punch or drill all of these before shaping and attaching the koshimaki.
Curve the koshimaki to fit and put a horizontal lip on it if necessary. (This lip is really only necessary if you are making a ribbed bowl. Note that the rib need not be as high as the others, as part of its “height” is actually the thickness of the metal in the koshimaki. The ribs and the lip should be on a level plane.) Clamping it in place on the hachi, take a sharpie and mark the holes through the inside of the hachi for the rivets. Punch or drill the holes, and rivet the koshimaki onto the bowl starting at the center back. Rivet the koshimaki closed at the front. This center rivet (and indeed, the entire front of the koshimaki) will be concealed by the visor. Depending on the style of shikoro you are using, you might want to warp the koshimaki out by hammering it over the edge of the anvil.
Hammer up into a sharper angle the front part of the koshimaki, which corresponds to the area covered by the visor. This is to support it. At either end of this section, you can apply a small metal plate called an ategane. This plate is cut and bent as shown in the pattern. The purpose of the ategane is to lend strength to the joint with the koshimaki and mabizashi. There are two rivets in the ategane, but you should rivet only the one towards the center front; this holds the ategane to the koshimaki. The second hole is for a rivet that goes through the ategane, the koshimaki, and the ends of the mabizashi. Only put in this rivet when the visor is finished.
Cut out the visor, punch or drill the holes to attach it to the helmet (as well as any rivets to attach a crest holder), and give it a gentle curve. If you are not covering it in patterned leather, put a faint rim along the bottom edge. This is really nothing more than a upturned lip of the bottom 116” of the mabizashi.
The visor is attached to the koshimaki primarily with three broad, low, domed rivets. These are split-shanked rivets, looking like nothing so much as overgrown paper brads. If you have the capability to make these from conventional broad dome rivets (by sawing or filing out a third of the shank), wonderful! If not, you can use a normal dome rivet, but cut the shank as short as possible, as they are broad and piening one of them over takes time. (NB: If you’re intending this helmet for SCA combat, don’t use split shank rivets here!) At either end of the mabizashi, place two more rivets (normal tinner’s rivets) through the koshimaki and ategane. These rivets are ground flat.
You can use other bill shapes, of course. Let the illustrations herein and the armour books in the bibliography be your guide.

Put four rivets through the holes in the hachi for the shiten-no-byō. Do these with the method described above for a koboshi kabuto, (i.e., protruding on the outside and ground or filed to a low, slightly domed or pointed tip). You can either leave empty the holes below—the hibiki-no-ana—or after painting the bowl you can put a small loop of flat braid through the hole, knotted inside the bowl.

Cut out and form the oharaidate (crest holder). There are more complex versions, but I’ve provided a simple one that should serve you well. Attach it to the front of the kabuto. Note that the central of the three dome rivets goes through the oharaidate. There is a second rivet lower down on the crest-holder, but it must be ground flat and is invisible.
Last step: signing the bowl. Traditionally, the armourer will chisel his signature into the center back plate at the base. Japanese is written vertically, so this is easily done. Only the Bamen school of armourers signed horizontally, one character per plate, centered on the back, along the bottom of the hachi.
If you are attaching a permanent grill to make this a combat kabuto, the grill assembly (see below) is the next step. Only when you’ve got the grill finished and permanently mounted should you finish the bowl.
Now you have to paint the bowl, inside and out. Regardless of what color lacquer was on the outside, the inside was often gold (and sometimes red—the underside of the bill was often red, either way). If you’re proud of your metalwork and want to show it off, you can even use a clear coating as was done by some master armourers in Japan.
Finishing the Hachi
The last attachments are the metal fittings. Historically these were usually made of copper and gilded. but you can use sheet brass and get a similar effect.

Attach the kasajirushi-no-kan to the hole in the middle of the center back plate. The simplest version of this is a ring with a cotter pin, the split shank of which is pushed through the hole in the hachi and expanded to lock it into place.
The last touch is the tehen-no-kanamono (the ornamental metal fitting around the tehen). The easiest tehen to make is several concentric rings of brass or copper with a hole in the center of each that corresponds to the diameter of the tehen itself. The best thing to do is to take a chisel or cross-pien hammer and indent the rings a few dozen times to give the impression of “spokes” or the petals of a chrysanthemum. Get a copper tube (acquired from any hardware or plumbing supply house) with the same outer diameter of the tehen’s opening and about one inch long and cut six triangular sections out of the bottom 3/4".

Put the tube through the tehen so that the “legs” are inside the helmet bowl. Before spreading out the legs, slip a leather washer inside the helmet bowl; this is a shock absorber to prevent the metal from jangling about. Splay the legs out, and at the same time, carefully spread out the top opening of the tube with the round end of a ball-pien hammer. This should hold the rings of the kanamono solidly to the hachi.
Lining the Hachi
If you’re making a helmet for combat, forgo the traditional lining and glue in a ring of foam padding wedges. It will keep the helmet from ringing. What’s more, it’s also a safer alternative.
The typical and traditional lining (or ukebari) is made in a rather tedious process. A large square of cloth (usually heavy cotton or crepe) is the basis. The armourer knots a long, strong thread in the center, and begins sewing a running stitch in a long, tight spiral (about 14" between spirals) around and around the cloth. As you get farther from the center, start pulling the fabric into little puckers as you sew. The fabric will start to develop a hemispherical shape.
When it forms a bowl about 3 1/2" deep, you’re done. Put the helmet down on the cloth bowl and mark the koshimaki’s perimeter on the cloth. Cut away the excess. Take some bias tape (better yet, a long strip of 3/4"-1" wide deerskin folded in half) and sew it along the edge of the ukebari, but only on the bottom side. The top of the bias tape goes outside, over the rim of the koshimaki, and is stitched into place through the tiny pairs of pre-punched holes at the edge. Thread is run through these holes a few times and sewn off, forming essentially thread staples. Artificial sinew, available at your nearest leather hobby shop, is wonderful for this purpose.

If you want your signature to be readable, you can cut an oval opening at the base of the back of the ukebari but be sure to run bias tape around the opening and stitch it in three or four times.

Your last step with the hachi is to attach three rings (as described in the chapter “Before Beginning”) through the oblong holes in the koshimaki. These are to hold the helmet cords. Alternately, you can make two holes in the koshimaki where the rings are intended to go, and tie loops of braid into these sets of holes. Either of these methods is acceptable.

The shinobi-no-o (helmet cord) is a heavy and round, about a half-inch in diameter. Period examples are typically made from a panel of fabric like silk crepe about six feet long and 14” wide which is rolled into a long snake and sewn up.
The hachi is now finished. You have to decide on a shikoro next. (I probably shouldn’t have to mention that you should have decided on this long ago....)
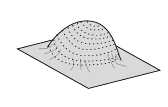
Zunari Kabuto
The famous so-called three-plate helmet is actually quite easy to make. It helps to have a Vietnam or WWII U.S. Army helmet to use as a kata; the shapes are nearly identical. You don’t have to follow that mold religiously, however. There have been nearly round versions as well as almost pointed ones, although the army pot shape is considered the ideal.
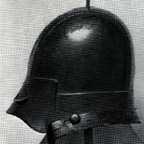

As these two illustrations show, there could be considerable variation in the styling of a zunari kabuto.
It must be remembered that there are two different types of hineno kabuto: one in which the koshimaki only reaches the visor (you can tell these by the small points of braid, which hold the lining inside the bowl, along the edge of the visor), and one in which the koshimaki is a full-circle. This plan is for the latter.

What is the difference? With a full koshimaki, the ties holding the lining in are invisible; with a truncated koshimaki, the lining has to be tied to the visor, so lines of stitching are visible on it. See the chapter “The Kabuto” for examples.
Copy the pattern onto the metal you will be using. Use a thicker gauge steel for the side plates, as the dishing takes something out of it. For a dress helmet, I’d recommend 16 for the sides; for a combat-quality helm, I’d recommend 12, or 14 at the very least. Cut out the metal. Punch or drill all the holes in the broad koshimaki, the mabizashi, and the ventral plate.

Begin by curving the koshimaki and riveting it closed. (Again, the closure will be completely covered by the visor.) Curve and dish the ventral plate and check it against your kata. Don’t overdish this plate; it’s easy to put too much of a curve into it. When you’re it fits the shape you want, rivet it to the koshimaki front and back. This is your frame.
This method may seem backwards and counter to what you would expect—namely, dishing the sides first, and then the top to fit, and finally the koshimaki. Well, this is the way the Japanese armour manuals say it is to be done, and I trust them that they knew what they were doing.
Now dish the side plates. Make sure they are symmetrical. Keep checking them against the kata or a photograph of your prototype. When they fit inside the frame, hold one in place at a time and mark the holes for rivets. Punch or drill the holes, then rivet the sides inside the frame, piening the rivets over on the outside.
Remember that your purpose is not so much to pien the rivets over as to mash them into the holes, as you will be filing or grinding the rivets flat. While there have been zunari with bulbed or even domed rivets, they just always look somehow wrong—those bumps ruin the smooth lines.
Curve the visor and hammer the bottom lip out slightly. Hold the visor in place, mark the holes on the finished bowl with a Sharpie, and drill them out and rivet it solidly into place.
The next step is to grind down all the protruding rivet shanks. If your helmet is for combat, you must make detours here to alter it to combat quality (see below). If you’re making a dress kabuto, or one to use as the frame for a kawari kabuto, carry on. (If you’re intending to build up a papièr-mâché body for a kawari kabuto, you might want to leave some or all of the rivets protruding to give something for the built-up section to grip.)
Paint the bowl. I seem to recall seeing a few hineno kabuto with a gold interior, so that’s an option here, too. The last step is now the lining, which is done in the manner described above for multi-plates.
With this helmet, the standard types of shikoro were the hineno-jikoro or the etchū-jikoro, although the Japanese attached all manner of shikoro to these helmets, including some pretty odd combinations. Patterns are provided for a hineno shikoro. The etchū shikoro is five lames of straight profile. They are all arcs, to be sure, but unlike the hineno shikoro there is no sloping or slanting.
Shikoro
As mentioned in the previous chapter, there are many varieties of shikoro. Of necessity, shikoro lames are narrower than those used in the construction of the dō, and perhaps even narrower than the sode. When of kozane construction, the scales are shorter than those used in the rest of the armour, and of course tapered to create the arc that defines the shikoro’s shape.
Note that the type of shikoro has no bearing as to the style of the shikoro. You can use hon kozane, solid lames, iyo zane, whatever. The shikoro should, however, be of a matching style to the rest of the dangly bits.
General Construction Notes
It is extremely difficult to provide patterns for shikoro, as the actual pattern and curve are dependent on the circumference of the helmet, the depth of the koshimaki, and the shape of the bowl. The easiest way to produce your own patterns is with posterboard, starting first by making a rough approximation of the hachitsuke no ita and then refining that one. From there, you proceed making one lame at a time and attaching each one to the other with masking tape as you proceed. You must remember to take into account the space between the lames, the space created by the thickness of the lacing.
A sample hineno-jikoro pattern is provided for reference. If it doesn’t actually fit your kabuto, it will show you what the relevant shapes are and should be. Cut the shikoro to the patterns provided. Lay out your lines for lacing before doing anything else, and drill or punch all the holes. When he made a reproduction of one of the helmets of Takeda Shingen several years ago, one of my Kenkyū Kai teachers had to punch holes for kebiki lacing in a kasa-jikoro of ita-mono (solid lame) construction. It took him several weeks to do them all. Afterward, he referred to it as his “combative struggle with the holes.” He wasn’t exaggerating.
Judging from surviving kabuto, an appropriate number of sugake odoshi lacing pairs is 11 or 13. Don’t forget the mimi-ito.
The top lame of the shikoro, which is called the hachitsuke-no-ita (the “helmet-attaching plate”) is typically bereft of nawame or hishinui along the top. These would get in the way of the rivets that hold the shikoro to the koshimaki. The front ends of this lame should almost reach the edges of the mabizashi. If you need to extend the patterns to accomplish this, do so. The edges of the shikoro should also form a straight line (or at least a diagonal line) down; that is, there is no staggering or zig-zagging. Take care when you alter the patterns that you take into account the thickness of the lacing and the curvature of the lames so that they line up properly.
Cut the lames and punch the holes. Only after your holes are punched should you form your lames into graceful, sweeping curves. If you are using kozane, remember to use shiki; they are necessary to help the shikoro lame hold their curves.
Shikoro are attached to the koshimaki by four pairs of ornamental, split-shanked rivets (or real rivets, if the kabuto is intended for combat). The rivets are occasionally seated on decorative brass strips (hassō kanamono—identical in most ways to those used in other areas, like where the dō to is rivetted to the munaita, and so on).
An alternative is three or four cords or leather thongs passing through pairs of holes in the hachitsuke-no-ita and the koshimaki beneath it. In the latter case, they are knotted on the inside. In fact, Sakakibara Kōzan tells us that the reason for pairs of rivets is so that if one or two are lost in combat, a temporary, instant repair can be made by passing a cord through the now-vacant holes.
I will leave it up to you whether you use rivets or lace to fasten your shikoro.
Hineno-jikoro
This is the only shikoro style you can readily make combat quality without much modification. What I suggest for the combat version of this shikoro is to lace and rivet the lames—a rivet can easily be hidden behind the cross-laces, and you can rivet and lace as you go. You’ll have to paint the shikoro prior to riveting and lacing, of course. The first four lames are rivetted solidly to each other, while the other one or two are allowed to hang freely in the conventional way.
You can, of course, make a conventional hineno-jikoro with no rivets, but I wouldn’t fight in one.
The fukigaeshi are typically made in one piece with the hachitsuke-no-ita, but you can cut them out of a separate piece and attach them by folding a panel back under the lame and fastening it with two rivets.
For a combat hineno-jikoro, you might want to make the fukigaeshi of leather (so as not to be destroyed by sword blows, nor to eat up the rattan of your opponents) and fasten them in this manner.
You can also make the fukigaeshi of metal, but a separate plate, with a lip folded back. You can wear the fukigaeshi by inserting the lip between the hachitsuke-no-ita (top plate of the shikoro) and the koshimaki, and removing them to fight.
Kasa-jikoro
The kasa-jikoro is most useful for dress armours, as the shikoro consists of only three lames, and is rather shallow.
While the lower two lames are simply curved, the hachitsuke-no-ita has a compound curve. It wraps to fit the koshimaki and is also slightly dished. This is the hardest thing to do, believe it or not. It’s easy to over-dish, so be careful.
Ichimanjū-jikoro
Like the kasa-jikoro, the top plate (hachitsuke-no-ita) of ichimanjū-jikoro has a slight dishing in addition to its wraparound formation. The dishing is more pronounced here, though. Unlike the kasa-jikoro, the ichimanjū has five or six lames, and they extend out and down rather than just out.
Komanjū-jikoro
To make this shikoro, all the plates have a slight compound curve. Alternately, the amount of the arc is varied as the lames descend, giving the shikoro its overall rounded-body shape.
Etchū-jikoro
This is a very simple pattern. The shikoro lames are virtually horizontal, with perhaps only the barest arc. They have a flat profile, as well.
Face Armour
See the chapter “Men Yoroi” (“face armour”) for details on constructing dress and combat versions of armoured masks.
Modifications for Combat
If your intention is to wear a kabuto in combat, you’ll have to make a few adaptations during the construction process.
The first adaptation for a multiplate is strengthening the mabizashi. Due to its sticking out the way it does, you might want to make it out of a heavier gauge of metal (14 or even 12 gauge), or use a different type of visor (e.g., the tosei, or “modern” visor, similar to the one on a hineno kabuto, which lies closer to the hachi). Either way, attach it with solid rivets rather than split-shank rivets. Take no chances.
I don’t like the weight that a combat-quality steel shikoro calls for, so I prefer a solid metal skirtplate under the koshimaki, which is cosmetically hidden by a shitajikoro (under-shikoro). This is just a large rectangle of steel cut long enough to circle the hachi and expose only your face, and cut wide enough to extend from the base of the hachi to the bottom of where a normal helmet would extend. Wrap the plate and put it inside the hachi before you attach the koshimaki, and mark the placement of the holes with a Sharpie. Punch or drill them all out, and rivet it to the inside of the hachi at the same time you rivet the koshimaki to the outside. If you intend to make a close fitting shikoro, you can ignore this suggestion.
Of course, if you’re making this combat quality, you’ll also have to use a different lining system such as closed-cell foam, and use a regulation chin strap.
Since your shikoro will take a beating (unless you’re a very good fighter) you’ll need something more resilient than 22-gauge steel, but not as heavy as 16-gauge steel. Your options are steel or leather. This is one of a very few instances where I recommend plastic armour: the sides of a small bathroom-size garbage can work very well, and the plastic nicely imitates lacquered plates. You can also use leather, but you’ll have to use cuir-bouilli (thin leather, though, so as to not throw off the balanced appearance) to maintain the shape. Whichever choice you make, follow the normal patterns and rules for making shikoro; with the metal underplate, the shikoro is cosmetic, not structural.
If you are going to be fighting with this armor, you have two choices for protecting your mush: a bar-grill faceplate, or a traditionally styled sōmen. You also have the choice of making a grill integral with the helmet or removable. If you are also making a dress kabuto as well, and you prefer the vison and breathing advantages of a grill, there is no need to make the grill removable, but it is up to you. Needless to say, the grill is a concession to modern safety and is not a traditional means of protecting the face.
Shita-jikoro

The only reason for a shita-jikoro for our purposes would be to disguise the skirtplate protecting the side and back of the head in a combat helmet.
The under-shikoro is made of three slightly overlapping panels of cloth. The back-most panel overlaps the edges of the side panels. The panels are either simply padded, lined with Japan’s hexagonal brigandine, or even covered with mail. They begin where the visor ends (i.e., they cover the same surface the shikoro does) and they hang almost to the shoulder.
The panels are all edged with bias tape and suspended from the inside of the koshimaki, to which they are tied in place much the same way as the ukebari is secured—pairs of holes and thread “staples.”
Bar Grill
Decide first if you want the grill removable. If you’re making a really fancy kabuto that you want to serve also for dress, removable is the best route. I personally prefer a permanent grill, but I also have several dress helmets in various stages of construction.

For a removable bar grill, you will use the helmet crest holder to help hold the grill in place. You will also have to place two buckles—one on either side—of the solid under-shikoro plate. Don’t worry about the look of these buckles: they’re under your cloth shita-jikoro, and completely invisible. For the grill itself, you will need several feet of quarter-inch rod stock and a few feet of 3/16"-1/4" by 1/2"-3/4" wide barstock.
Use the pattern here to make the solid sections. Be careful: you will have to modify this pattern to fit your actual helmet, so it may be shorter, or it may be longer. You will need to work this hot; if you don’t have access to a forge or propane torch, you’ll have to get some help. When the metal is still hot, poke 1/4" holes every 1" along the surface. Curve the rodstock and force it through the holes, welding them in place. Flatten each end of the bars and open holes for rivets. Rivet them to the side strips. Paint the grill black, which should make it neutral and not too obvious.

At either side, on the side strips, rivet a leather strap which will fastened to the buckle on the wrapping plate.
The upper section should go over the visor and is anchored behind the crest holder. In this way, the grill is held up. With the leather straps, it is held on. I’d suggest gluing a strip of leather (only about 4 oz.) along the inside of the top, to keep it from rubbing against the paint on the visor.
If you are making an integral grill, the grill will have a slightly different shape. Note that you will have to turn the center rib 90° and bend it in so that it is flat under the visor, where you must rivet it solidly in place. (If you are planning this, it’s a good idea to leave out the central large, domed rivet on the visor and use it to go through the grill as well as the visor and koshimaki.) Instead of using solid metal side strips, you will weld or rivet these bars directly to the under-shikoro plate.
Note that there is an extra strip of metal under the chin. This is to hold the yodare kake. Directions for what to do with this plate, and for making the yodare kake, can be found in the chapter “Men Yoroi.”